Stock Item Kya Hai? Tally Me Stock Items Ko Kaise Banaye?

Aaj Ke Badalte Hue Time Me Kya Aap Manually Stock Items Ko Ek Book Me Note Karke Rakhte Hai, Ya Phir Time Ke Sath Aapne Bhi (Tally ERP 9) Software Ka Use Karna Suru Kar Diya Hai. Manually Stock Items Ko Hum Pahle Ek Register Me Stock Items Ki Details Ko Note Karke Rakha Karte The, Magar (Tally ERP 9) Software Ke Aane Ke Baad Stock Items Ko Maintain Karna Kafi Aasan Ho Gaya Hai. Aaj Mai Aapko Batauga Ki Tally Me Stock Items Kya Hai. Tally Me Stock Items  Kaise Banaye? stock item creation in Tally

Stock Item Ka (Tally ERP 9) Me Kya Use Hai.Hamare Business Me Stock Item Ki Kya Importance Hoti Hai. Tally Me (Single And Multi Stock Items) Kya Hai Aur Inko Kaise Create Karte Hai. Jaisa Ki Hum Jante Hai Ki Tally Me Stock Group Create Karne Ke Baad Stock Items Ko Hum Create Karte Hai. Aaj Mai Aapke In Sabhi Sawale Ke Jawab Duga.

Stock Item Kya Hai?

Jin Bhi Chijo Ko Hum Apne Business Me Sale Ya Purchase Karte Hai Unko Hi Hum Stock Items Kahte Hai.Business Me Stock Item Ka Use Aksar  Len Den Me Kiya Jata Hai.

Tally Me Stock Items Ko Kaise Banaye?

Tally Me Stock Items Ko Banane Ke Liye Hamko Kuch STEPS Kom Follow Karna Padega.

STEP-1: Tally Me Stock Items Banane Ke Liye Gateway Of Tally Me Inventory Info Me Click Kare Phir  Stock Items Me Jake Click Kare Then Create Ke Option Par Click Kare.

process of stoc item create

STEP-2: Stock Item Me Name Ke Box Me Us Stock Item Ka Nam Likhege Jisko Hame Create Karna Hai. Example Hum Redmi Mobile Nam Ka Ek Stock Item Create Karte Hai.

Stock Item Create

STEP-3: Under Me Hum Us Stock Group Ko Select Karege, Jiske Under Me Redmi Mobile Aata Hai. Jaise Ki Hum Jante Hai Ki Redmi Mobile (Mobile) Nam Ke Stock Group Ke Under Aaega, To Hum Mobile Stock Group ko Under Option Me Select Karege.

Stock Item under

STEP-4: Units Sabse Pahle Jante Hai Unit Kya Hoti Hai Units Wo Hoti Hai Jiske Through Hum Kisi Bhi Chij Ke Napate Hai, Aur Har Vastu Ki Apni EK Alag Units Hoti Hai. Example-( Milk Ki Unit Hogi Liter Etc ), To Units Me Hum Ek Unit, Create Kar Lege, Ki Redmi Mobile Ko Kis Unit Me Sale Out Karna Hai. Maine Yaha Pieces (PCS) Name Ki Unit Create Ki Hui Hai.

Stock Item Unit

STEP-5: Opening Balance Agar Us Item Ka Koi Opening Balance Hoga To Uski Jo Bhi  Quantity,Rate(per) Aur Value Jo Bhi Hoga Us Ko Hum Dal Dege.

Stock Item quantity And Rate

Stock Items Ko Dakhna, Alter Karna Aur Delete Karna:

Stock Items ko Dakhne Ke Liye Gateway Of Tally Me Inventory Info me jake Stock Items Me Display Option Par Click Karege, To Aapne Jo Jo Bhi Stock Items ko Create Kiya hai wo Sabhi Stock Items Aapko Dikhai Dege.

Stock Items Ko Alter Karna:-

Stock Items ko Edit Karne Ke Liye Aapko Alter Option Me jake , Click Karna Hai .Waha par List Of stock Items Me Aapko Wo Items Ko select karna Hoga Jisko Alter Karna Hai To wo Item Open Ho Jaegi. Ab Aap Stock Items Ki Sari Details Ko Edit Kar Sakte Hai.

Stock Items Ko Delete Karna:-

Stock Items Ko Delete Karne Ke Liye Bhi Hamko Alter Option Me Jake, List me Jo Stock Item Ko Delete Karna Hai ,Usko select Karege Aur (Alt+D) Keyboard Se Press karege Wo Stock Item Delete Ho Jaegi.

Single Stock Items Kya Hain?

Tally Me Jab Ek Time Me, Ek Hi Stock Items Ko Hum Create Karte Hai To Usko Single Stock Items  Kahte Hai (As Like- Redmi Mobile Ko Create Karna)

Stock Item Single

Multi-Stock Items Kya Hain?

Multi-Stock Items Banane Ke Liye Gateway Of Tally Me Inventory Info Me Jake Stock Items Par Click Karege. Fir Multi Stock Item Me CREATE Par Click Karege, Uske Baad Ek Page Open Hoga Jisme Under Group Ke Option Me All Items Ko Select Karege. Uske Baad Name Of Item Me Wo Us Item Ka Nam Likhege Jisko Aapko Create Karna Hai. Under Ke Option Me Jo Stock Group Humne Create Kiya Hai Usko Select Karege, Fir Units Ke Option Me Hum Us Unit Select Karege, Jo Ki Us Stock item Ki Unit Hogi And Opening Quantity Agar Us Stock Item Ki Hogi, To Rate And Amount Ko Fill Karke Stock Item Ko Save Kar lege.

 Example Yaha Maine Kai Sare Multi Stock Items Ko Create Kiya Hai.

multiple Stock item create

Stock Category Kya Hai?

Stock Category Means Hamare Stock Ko Alag-2 Category Me Divide Karna Jaise- Tv Hamara Ek Stock Group Hai Aur T.v Kai Inches Me Market Me Aata Hai. Like( 25 Inch,32 Inch,40 Inch Etc) Hum Isi Ko Category Kahte Hai.

Means Stock Items Ko Alag Alag Category Me Divide Kar Dena Jis Se Hamko Apne Stock Ki Puri Knowledge Ho Sake Ki Hamare Business Me Kaun Sa Stock Item Hai Aur Wo Stock Item Kis Category Me Available Hai.

Tally Me Stock Category Option Ko Active Kaise Kare?

First Step: Tally Me Stock Category Option Pahle Se Active Nahi Hota Hai. User Ko Apni Suvidha Ke Anusar Is Option Ko Active Karna Hota Hai. Stock Category Option Ko Active Karne Ke Liye Gateway Of Tally Me Features Option Me Jaye Ya Phir Keyboard Se (f11) Botton Ko Press Kare

Feature option tally

Next Step: Yaha Inventory Features Par Click Kare.

inventory Features

Next Step: Uske Baad Inventory Se Related Window Open Hogi, Yaha Par Storage And Classification Option Me Aapko Maintain Stock Category Option Dikhega.  Is Option Ko Yes Kar De Aur Isko Save Kar Le. Save Karne Ke Liye (Ctrl+A) Keyboard Se Press karege, Ab Aapka Stock Category option Active Ho Gaya Hai.

stock categegory Features

Tally Me Stock Category Banana?

STEP-1: Tally Me Stock Category Option Ko Active Karne Ke Baad Gateway Of Tally Me Inventory Info Me Jaye Aur Yaha Aapko Stock Category Ka Option Dikhai Dega, Yaha Click Kare Aur Create Option Me Jake Click Kare.

Process of stock category

STEP-2: Yaha Aapko Stock Category Creation Ki window Dikhai Degi. Isme Name Me Hum Wo stock Category Ko Nam Likhege, Jisko Hamko Create Karna Hai. Suppose Hamko (Tv) Jo Ki Hamara Stock Group Tha, To Hamko Tv Ke Lie Stock Category Ko, Create Karna Chahate Hai, To Hum (32 Inches Sony Tv ) Ki Stock Category Create Kar Lege.

stock category banana

STEP-3: Under Me Hum Primary Option Ko Hi Select Karege Aur Yes Karke Save Kar Lege. Hamari Stock Category Create Ho Gai Hai.

stock category primary

Stock Group, Stock Category And Stock Items List With Example:-

S.No

Stock Groups

Stock Categories

Stock Items

1

T.v

19 inches

Sony

2

T.v

21 inches

LG

3

T.v

32 inches

Videocon

4

Laptop

15.6 Screen

Lenovo

5

Laptop

18.6 screen

Acer

6

Laptop

23.5 screen

HP

7

Fridge

21 inches Long

Sony Fridge

8

Fridge

25 inches Long

Whirpool

9

Fridge

18 inches Short

Samsung

10

Washing Machine

32 inches Long

LG

11

Washing Machine

40 inches Long

Samsung

12

Washing Machine

23 Inches Short

Sony

13

Mobile

3 Gb Ram 32 Storage

Redmi

14

Mobile

2 GB Ram 16 Storage

Moto

15

Mobile

4 Gb Ram 64 Storage

Apple


Yaha Kuch Stock Items List Ko Maine Bataya Hai. I Hope Its Helpful for You.


Basic Concept of Inventory

Basic Concept of Inventory
(बेसिक कांसेप्ट ऑफ़ इन्वेंटरी)
इन्वेंटरी का मतलब कच्चे माल, बिक्री के लिए उपलब्ध आइटम और बिक्री के लिए तैयार हो रहे माल तीनो से है,दूसरे शब्दों में इन्वेंटरी से आशय  किसी भी कंपनी द्वारा इन्वर्ट किया गया जो अमाउंट उसके द्वारा कच्चे माल, आधे बने माल और तैयार माल पर खर्च किया जाता है |किसी भी कंपनी की बैलेंस शीट में  इन्वेंट्री को सम्पति के रूप में माना जाता है क्योकि वह बिक्री के बाद कैश में बदल जाता है |


इन्वेंटरी ऑफ़ प्रोडक्शन कंपनी

Row Material : उत्पादन प्रकिया को पूर्ण करने के लिए जो आइटम प्रयोग किया जाता है जिनसे सेल्स प्रोडक्ट बनता है वह रो मटेरियल कहलाता है |
Work in process : यह अर्ध्द निर्मित माल का मूल्य होता है अर्थात जो माल तैयार हो रहा है उसकी वैल्यू को वर्क इन प्रोसेस कहते है |
Finished Goods : यह वह इन्वेंटरी है जो निर्मित हो चुके माल में प्रयोग होती है अर्थात ऐसा माल जो बिक्री के लिए उपलब्ध हो |
Consume :वह आइटम जो किसी कंपनी के नियमित कार्यो के लिए प्रयोग होते है लेकिन यह प्रोडक्ट का पार्ट नहीं होते है |
उदाहरण: साइकिल इन्वेंटरी के लिए नया निर्मित माल तथा साइकिल अंतिम उत्पाद है |
Inventory Feature’s in Tally
Inventory Features
इस फीचर के द्वारा हमें आवश्यक इनवेंटरी फीचर्स सेट किए जाने की सुविधा मिलती है। Company menu पर Inventory Features को सिलेक्ट करने पर हमें निम्नलिखित स्क्रीन प्राप्त होती है।

Company Features →Inventory Features

Image result for inventory features
1.General
(a) Integrate accounts and inventory: यह फील्ड भी अकाउंटिंग फीचर्स में वर्णित किए गए कार्यों को ही निष्पादित करती है।
(b) Allow Zero Valued entries: यदि हम शून्य मूल्य की प्रविष्टियाँ करना चाहते है तो इस ऑप्शन को Yes पर सेट किया जाता है।

2. Storage and Classification
(a) Maintain multiple Godowns: यदि हमारे पास एक से अधिक स्टॉक पॉइंट /स्टोरेज लोकेशन्स/ गोडाउन विद्यमान हैं और हम इन लोकेशन्स के मध्य होने वाले स्टॉक के संचालन का हिसाब-किताब रखना चाहते हैं तो इस Options को Yes पर सेट करे। हमारे द्वारा इस options को Yes पर सेट किए जाने बाद ही Gateway of Tally>Inventory info मैन्यू में गोडाउन्स पर stock options प्रदर्शित किया जाएगा। हम प्रत्येक लोकेशन पर अपने स्टॉक्स की पहचान करने में सक्षम होने के साथ ही साथ वाउचर एंट्री के दौरान एक अथवा अधिक लोकेशन्स के लिए स्टॉक संचालन प्रदान कर पाएँगे।

(b) Maintain Stock Categories: यदि हम स्टॉक केटैगरीज बनाना तथा व्यवस्थित रखना चाहते हैं तो इस options को Yes पर सेट करे। यह Stock item creation स्कीन के अंतर्गत एक नई फील्ड Category की रचना करेगा।

(c) Maintain batch wise details: स्टॉक आइटम्स से संबंधित बैच इंफॉर्मेशन को व्यवस्थित रखने हेतु इस options को Yes पर सेट करें| stock item creation स्कीन के अंतर्गत एक नई फील्ड Use expiry dates प्रदर्शित कर दी जाएगी।

(set expiry dates for batches): यदि हम बैचेज हेतु एक्सपायरी डेट्स सेट करना चाहते है तो इस options को Yes पर सैट करे यह stock item creation स्कीन के अंर्तगत एक अतिरिक्त फील्ड Use expiry dates Show करेगा। यह उन व्यवसायों के लिए उपयोगी होता है जो एक्सपायरी डेट्स वाले माल जैसे कि दवाइयाँ, भोजन और अन्य नाशवान पदार्थों का व्यापार करते हों। वाउचर एंट्री के दौरान डिफाल्ट रूप से वाउचर की दिनांक को ही उत्पाद के निर्माण की दिनांक के रूप में माना जाता है। इस दिनांक को परिवर्तित किया जा सकता है परंतु वाउचर दिनांक के बाद वाली किसी दिनांक पर नहीं। ठीक इसी तरह से एक्सपायरी दिनांक पर वाउचर दिनांक से पहले की दिनांक नहीं डाली जा सकती है।

(d) use different actual & billed Qty: यदि हम इनवॉइस तैयार करते समय actual और billed Quantity को अलग-अलग रखना चाहते है तो इस options को Yes पर सेट किया जाता है।

3. Order processing
(a) Allow purchase order processing: purchase orders बनाने हेतु यह options yes पर सेट करें। यह फीचर परचेज ऑर्डर के प्री-क्लोजर- हेतु भी प्रयुक्त किया जा सकता है।

(b) Allow sales order processing: sales orders बनाने हेतु यह options yes पर सेट करे। यह फीचर सेल्स ऑर्डर के प्रीआर्डर क्लोजर हेतु भी प्रयुक्त किया जा सकता है।

4. Invoicing
(a) Allow Invoicing: यह फील्ड भी अकाउंटिंग फीचर्स में वर्णित कार्यों का ही निष्पादन करती है।

(b) Use debit/credit notes: यह फील्ड भी अकाउंटिंग फीचर्स में वर्णित किए गए कार्यों का ही निष्पादन करती है।

Use invoice mode for debit notes: यह फील्ड भी अकाउंटिंग फीचर्स में वर्णित कार्यों का ही निष्पादन करती है।
Use invoice mode for credit notes: यह फील्ड भी अकाउंटिंग फीचर्स में वर्णित कार्यों का ही निष्पादन करती है।

5. Purchase Management
Track additional of purchase: यह फील्ड भी अकाउंटिंग फीचर्स में वर्णित किए गए कार्यों का ही निष्पादन करती है!

6. Sales Management
Use Multiple price levels: Multiple price levels निर्मित करने हेतु इस विकल्प को Yes पर सेट किया जाता है।

7. Additional Inventory Vouchers
(a) Use tracking numbers (delivery/receipt notes): यदि हम डिलीवरी नोट्स और invoice / bills के मध्य संबंध बनाए रखने के लिए ट्रेकिंग नम्बरों का उपयोग करना चाहते हैँ तो इस विकल्प को Yes पर सेट करे। यह परचेज और सेल्स दोनों के लिए उपलब्ध है।

(b) Use rejection inward/outward notes: यदि हम माल की अस्वीकृति का रिकॉर्ड किसी सामान्य डेबिट नोट या क्रेडिट नोट के माध्यम से नहीं बल्कि अलग से रखना चाहते तो इस विकल्प को Yes पर सेट करे।Budget in Tally
टैली में बजट का निर्माण खर्चो पर नियंत्रण रखने के लिए किया जाता है आप Tally.ERP 9, में Budget Feature का Use करके अपनी कंपनी के आय तथा व्यय पर नजर रख सकते है और यह भी देख सकते है की आय और व्यय आपके बजट के According है या नही | बजट कंपनी के Funds को और effectively Use करने में आपकी मदद करता है |

बजट एक निश्चित उद्देश्य के लिए एक निर्धारित अवधि के लिए बनाया गया विवरण होता है, जिसमे हम वित्तीय मामलो के बारे में विचार रखते है। बजट किसी व्यक्तियों या संगठन की क्षमता मापने का आसान तरीका है जिससे हम तय किये गए माप व वास्तविक कार्य की आसानी से तुलना कर सकते है। यह एक संगठन के उदेश्य पूर्ति के लिए बनाए गए घटक है जो कार्य के शुरू होने से पहले ही निश्चित कर लिए जाते है। यह संगठन की कार्य प्रणाली का blue print माना जा सकता है। बजट एक निश्चित अवधि के लिए आमतौर पर एक वर्ष के लिए एक वित्तीय योजना है। बजट किसी व्यक्ति, परिवार, लोगों का एक समूह, एक व्यवसाय,एक सरकार,एक देश,बहुराष्ट्रीय संगठन या किसी और चीज के बारे में किया जा सकता है जो पैसे कमाता है और खर्च करता है। बजट का उपयोग भविष्य के लिए योजना बनाने में किया जाता है ताकि हमे ये याद रहे की हम जो भी कार्य करे वो उस बजट के अनुसार करे ताकि हमारा तय किया गया हर कार्य हो सके |

Budget in Tally
Tally में बजट एक special option होता है। बजट का उद्देश्य कार्य के लिए बजट निर्धारण करना  होता है। इस option के द्वारा यदि हम किसी भी ledger का बजट create करते है तो उसके खर्चो के लिए रकम का निर्धारण कर लेते है। यदि उस particular ledger में निर्धारित रकम से ज्यादा हम खर्च करते है तो टैली में entry करते समय यह बतायेगा की निर्धारित रकम समाप्त हो चुकी है। यदि हम दूसरी बार किसी ledger का बजट बनाना चाहते है तो इसे हम बना सकते है।

How to activate Budget in tally

Budget बनाने से पहले budget feature को activate करना होता है उसके लिए आपको सबसे पहले F11 key का प्रयोग करते है। इस key को प्रेस करने पर एक option window display होती है इस window में एक option होता है। जो budget से सम्बंधित रहता है इस option को yes करने पर बजट activate हो जाता है |

Gateway of Tally→F11: Features (Accounting Features)

Image result for activate budget in tally

यहाँ ‘Maintain Budgets and Controls’ ऑप्शन को ‘Yes’ पर सेट करे
How to create Budgets in Tally

बजट को activate करने के बाद budget option activate हो जाता है | आप budget option पर जाने के लिए आपको पहले Gateway of tally के अंतर्गत Account information में बजट ऑप्शन मिलता है। जब आप इस ऑप्शन को एंटर करते है तो आपको तीन ऑप्शन मिलते है- Create, Alter ,Quit | create option का प्रयोग नया बजट बनाने के लिए किया जाता है , Alter option का प्रयोग पहले से बने हुए बजट को देख सकते है और उसमे आप अपने अनुसार जो परिवर्तन करना चाहते है तो कर सकते है |

अब आपको budget create करने के लिए create option पर select करना होता है जिससे आपके सामने budget creation window open हो जाएगी। अब आप बजट create कर सकते है |

Individual ledger account, groups of ledger accounts तथा Cost Centers इन सभी के लिए हम Budget बना सकते है।
उदा. के लिए traveling, advertisement, operations आदि के लिए बजट बना सकते है। बजट बनाने के लिए निम्न स्टेप्स को फॉलो करे |Gateway of Tally →Accounts Info.→Budgets→Create पर क्लिक करे |

Image result for create budget in tallyImage result for create budget in tally
Create option पर क्लिक करने से Budget Creation Window open होगी यहाँ आवश्यक जानकारी भरे |

 Name-यहाँ बजट का नाम दे |
Under- यहाँ primary सेलेक्ट करे |
Period of Budget- यहाँ बजट का पीरियड बताते है की कब से कब तक के लिए बजट बनाना है |

Related image
Alter budget
Gateway of tally→account info→budget→alter

आल्टर ऑप्शन का प्रयोग हम पहले से बने हुए बजट को देखने के लिए और उस बजट में  परिवर्तन करने के लिए करते  है।
1) Name: यहाँ पहले से बना हुऐ बजट का नाम डालते है। जिसको आप देखना या change करना चाहते है।
2) Under: यहाँ Default या पूर्व में बने किसी बजट को चुन सकते है।

Delete a budget
Gateway of tally→account info→budget→alter→alt+D

बजट को हटाने के लिए आपको आल्टर ऑप्शन सेलेक्ट करना होता है जिससे एक विंडो ओपन होती है उसमे बजट के नाम की सूची में से जिस बजट को हटाना हो उसे चुनते है और Alt +D key दबा देते है जिससे वह बजट डिलीट हो जाता है।

what is tally, what is accounting, start up windows, change the language

टैली क्या है (What is Tally)

हमारे जीवन मे अंकाउंट का काफी महत्त्व है। व्यवसाय में रिकार्ड को तैयार करना व उसे मेंटेन रखने के लिऐ, सरकारी कार्यलयों में विभिन्न खाते तैयार करने और व्यवसायियों के लिऐ यह काफी आवश्यक है। अकाउंटिंग प्रत्येक व्यक्ति के लिए उतना ही महत्वपूर्ण है जितना धन।

टैली का अर्थ रुपयो कि अकाउंटिंग करना गिनना व्यवस्थापन व रिकार्ड रखना है।माल कहा गया कहा से आया किस चीज़  पर व्यय हुआ आज कितना व्यय हुआ ।कितना माल  निकाला किसने निकाला ये सब कार्य  टैली के अन्तर्गत आते है।

Tally एक अकाउंटिंग सॉफ्टवेयर हैं, जो Tally Solutions Pvt. Ltd एक बहुराष्ट्रीय भारतीय कम्पनी द्वारा निर्मित कंप्यूटर सॉफ्टवेयर हैं सामान्य बोलचाल में tally को अकाउंटिंग से ही जोड़कर देखा जाता हैं, अपने व्यापार में किसी कम्पनी के वितीय लेन-देन (इनकम/खर्चे) को लिखकर रखना ही एकाउंटिंग हैं। पहले के जमाने में इसे बहियों में हाथ से लिखकर रखा जाता हैं, समय के बदलाव के साथ ही,  कम्पनी के अकाउंट को मेंटेन करने के लिए आज कंप्यूटर का उपयोग किया जाता हैं।

कंप्यूटर में जब एकाउंटिंग की बात आती हैं, तो एक ही सॉफ्टवेयर जेहन में आता हैं वो हैं टैली । व्यवसायिक व्यवहार और खातों को कंप्यूटर में सहेज कर रखने वाली टैली  प्रदाता कम्पनी का मुख्य कार्यालय बेंगलोर में हैं । भारत के अलावा कई अन्य देशों में यह टैली  सॉफ्टवेयर बेहद प्रचलित हैं, बिजनेस मैनेजमेंट में टैली  सबसे महत्वपूर्ण पहलु हैं।

पुस्तको रजिस्टर डायरी मे हम स्केल पेन्सिल से लाइने खीच -खीच  कर काॅलम बनाकर सब कुछ व्यवस्थित करते है और साथ मे गिनती के लिऐ केलकुलेटर भी रखते है।इस सब के बजाय कम्पयूटर पर एक साॅफ्टवेयर मिल जाता है जिस पर बिना  परेशानी के काॅलम बनाना ग्राफ चेक करना एकाउंटिंग करना ,रिकॉर्ड रखना सब आसानी से किया जा सकता है बस यही टैली है।

जैसे कंम्पनी के कर्मचारियों के भुगतान,कंपनी के साधनो पर आय व्यय,बैंक के विभिन्न खाते,लेन – देन रिकोर्ड ये सब टैली के काम है।
बिजनेस के प्रकारो के विस्तार के साथ टैली का विकास व उपयोग भी अलग- अलग और आसानी से हो रहा है।

टैली भारत और विदेशों में सर्वाधिक लोकप्रिय फाइनेंशियल अकाउंटिंग साँफ्टवेयर है। अपने आसान उपयोग, सरलता, यूजर अनुकूलता और विश्वसनीयता की वजह से ही इसने चार्टर्ड अकाउंटेंट्रस, अॅाडिटर्स एवं अन्य वित्तीय संस्थानों के मध्य ख्याति अर्जित की है। छोटे व्यवसाय से लेकर वृहद प्रतिष्ठान तक लगभग प्रत्येक कम्पनी द्वारा अपने लेखांकन प्रयोजन हेतु टैली का प्रयोग किया जा रहा है। वे कंप्यूटर का उपयोग जानने वाले और टैली में प्रशिक्षित कर्मचारी चाहते हैँ। पारंपरिक बही खाता लेखन विधियों को पूरी तरह से टैली के साथ प्रतिस्थापित किया जा चुका है।

टैली का प्रारंभिक रिलीज Tally 4.5 version था । इस Dos आधारित Software को 1990 के दशक के प्रारंभ में जारी किया गया था। यह बुनियादी वित्तीय लेखांकन उपकरण था। उन दिनों पर्सनल कंप्यूटर्स भारत में लोकप्रियता अर्जित कर रहे थे। Peutronics  (टैली को विकसित करने वाली कम्पनी) ने इस सुअवसर का लाभ उठाया और बाजार में अपना टैली 4.5 Version प्रस्तुत कर दिया। मोटी-मोटी जिल्द की गई बहियों की भारी-कम मात्रा को हिसाब-किताब हेतु प्रयुक्त करने वाले लेखा परीक्षक और अकाउंटेंट्स कुछ ही पलों के भीतर बैलेंस शीट्स एवं लाभ-हानि खातों की गणना करने की टैली की क्षमता देखकर हैरान रह गए। इतना सब कुछ करने के लिए हमें मात्र लेजर्स निर्मित करना और वाउचर्स में एंट्री करनी  होती हैं। शेष कार्य टैली करता है। वह हमारे लिए सभी स्टेटमेंट्स, ट्रायल बैलेंस और बैलेंस शीट बना देगा।


टैली के आगे चलकर Tally 5.4, Tally 6.3, Tally 7.2 Tally 8.1  और Tally 9.0 version जारी किये गए। इन संस्करणों  के अंतर्गत कंपनी के स्टॉक प्रबंधन हेतु प्रयुक्त होने वाली इनवेंटरी, कर्मवारियों की वेतन गणना एवं मजदूरी भुगतानों के लिए प्रयुक्त होने वाले पेरोल हेतु समर्थन और हिन्दी, तमिल, तेलगु, कन्नड, मलयालम, गुजराती, मराठी व अन्य बहुत सी भारतीय भाषाओं के लिए बहुभाषी  समर्थन सम्मिलित किया गया है।

What is Accounting
(अकाउंटिंग क्या है ?)

आधुनिक व्यवसाय का आकार इतना विस्तृत हो गया है कि इसमें सैकड़ों, सहस्त्रों व अरबों व्यावसायिक लेनदेन होते रहते हैं। इन लेन देनों के ब्यौरे को याद रखकर व्यावसायिक उपक्रम का संचालन करना असम्भव है। अतः इन लेनदेनों का क्रमबद्ध अभिलेख (records) रखे जाते हैं उनके क्रमबद्ध ज्ञान व प्रयोग-कला को ही लेखाशास्त्र कहते हैं। लेखाशास्त्र के व्यावहारिक रूप को लेखांकन कह सकते हैं। अमेरिकन इन्स्ट्टीयूट ऑफ सर्टिफाइड पब्लिक अकाउन्टैन्ट्स (AICPA) की लेखांकन शब्दावली, बुलेटिन के अनुसार ‘‘लेखांकन उन व्यवहारों और घटनाओं को, जो कि कम से कम अंशतः वित्तीय प्रकृति के है, मुद्रा के रूप में प्रभावपूर्ण तरीके से लिखने, वर्गीकृत करने तथा सारांश निकालने एवं उनके परिणामों की व्याख्या करने की कला है।’’

इस परिभाषा के अनुसार लेखांकन एक कला है, विज्ञान नहीं। इस कला का उपयोग वित्तीय प्रकृति के मुद्रा में मापनीय व्यवहारों और घटनाओं के अभिलेखन, वर्गीकरण, संक्षेपण और निर्वचन के लिए किया जाता है।

किसी व्यवसाय के वित्तीय लेनदेन का लेखा-जोखा रखने, उसका सारांश प्रस्तुत करने, रिपोर्टिंग तथा विश्लेषण करने की कला को ही एकाउंटिंग कहा जाता है। एकाउंटिंग का कार्यभार संभालने वाले व्यक्ति को एक अकाउंटेंट के रूप में जाना जाता है तथा अकाउंटेंट की भूमिका किसी रिकॉर्ड-कीपर के समान ही होती है। हालांकि, एकाउंटिंग को अब प्रबंधन का एक ऐसा उपकरण माना जाता है जो संगठन के भविष्य के विषय में महत्वर्पूण जानकारी देता है।

स्मिथ एवं एशबर्न ने उपर्युक्त परिभाषा को कुछ सुधार के साथ प्रस्तुत किया है। उनके अनुसार ‘लेखांकन मुख्यतः वित्तीय प्रकृति के व्यावसायिक लेनदेनों और घटनाओं के अभिलेखन तथा वर्गीकरण का विज्ञान है और उन लेनदेनें और घटनाओं का महत्वपूर्ण सारांश बनाने, विश्लेषण तथा व्याख्या करने और परिणामों को उन व्यक्तियों को सम्प्रेषित करने की कला है, जिन्हें निर्णय लेने हैं।’ इस परिभाषा के अनुसार लेखांकन विज्ञान और कला दोनों ही है। किन्तु यह एक पूर्ण निश्चित विज्ञान न होकर लगभग पूर्ण विज्ञान है।

Features of Tally
(टैली की विशेषताएँ)

प्रतिस्पर्धा और बढते व्यवसाय की इस दुनिया में जहाँ टैली ने सभी सीमाओं को पार कर लिया है वहीं यह एक ऐसा सर्वश्रेष्ठ, विश्वसनीय, तीव्रतम अकाउंटिंग सॉफ्टवेयर बन गया है जो व्यवसाय की जटिलता अकाउंटिंग आवश्यकताओं की पूर्ति करता है। टैली एक ऐसा सर्वाधिक शक्तिशाली, बहुभाषी और  बिजनेस अकाउंटिंग सॉफ्टवेयर है जो विभिन्न अकाउंटिंग स्टॉक और अन्य सर्वाधिक रिपोर्ट्स को एक ही बटन के क्लिक पर रिकॉर्ड करते हुए पब्लिश करने में सहायता प्रदान करता है। इस अनोखे अकाउंटिंग सॉफ्टवेयर में निहित विभिन्न फीचर्स और इसके लाभ निम्नानुसार हैं।

  1. टैली का उपयोग करना अत्यंत सरल है क्योंकि इसे त्वरित्त (तुरंत) डेटा एंट्री और पलक झपकने की गति से अकाउंटिंग संबंधी जानकारी प्राप्त करने में सक्षम बनाया गया है।

  2. यह user द्वारा Selected language में अकाउंटिंग रिकार्डस को रिकॉर्ड करने, उन्हें देखने और उत्पन्न करने में सक्षम बनाता है। यह टैली के महत्वपूर्ण फीचर्स में से एक है।

  3. यह 99999 कंपनीज का रिकार्ड एक साथ सुरक्षित रखने की अनुमति प्रदान करता है।

  4. टैली के प्रमुख फीचर्स में से एक यह है कि यह उन कंपनीज के लिये रिपोर्ट्स क्रिएट करने में सक्षम बनाता है जहाँ पर एक से अधिकलोकेशन्स के अकाउट्स का प्रबंधन किया जाता है।

  5. टैली द्वारा एक से अधिक विस्तृत डेटा को समतुल्य और अपडेट किया जाता है।

  6. टैली द्वारा कलेक्शन रिमाइंडर्स दिया जाना सुनिश्चित करते हुये बेहतर नकदी प्रवाह में सहायता की जाती है जो ब्याज की बचत में भी सहायक होता है।

  7. टैली भुगतान के मामले मेंखराब डेबिटर्स और बकाएदारों की पहचान करने में सक्षम बनाता है।

  8. टैली हमें कंपनी की उस इनवेटरी के प्रबंधन में सहायता प्रदान करता है जो प्रोडक्ट अनुसार इनवेटरी लेवल ज्ञात करने में सक्षम होती है तथा यूजर द्वारा तय स्तर पर विभिन्न प्रोडक्ट्स के लिये रीआर्डर लेवल ज्ञात करने में भी सक्षम होती है।

  9. टैली के फीचर्स में प्रोडक्ट अनुसार तथा इनवॉइस अनुसार लाभदेयता विश्लेषण (cost benefit analysis) तैयार करना भी शामिल है।

  10. टैली के उपयोगी लाभों में से एक यह है कि यह हमें एकाधिक अवधियों के लिये परफॉर्मेंस लेवल्स को समझने तथा विश्लेषित करने में सक्षम बनाता है। यह हमें कस्टमर बाइंग पैटर्न समझने में सक्षम बनाता है।

  11. यह स्टॉक की ट्रेकिंग (निगरानी) में सक्षम है ।

  12. यह हमें एक से अधिक वेयरहाउस लोकेशन पर निगरानी करने में सक्षम बनाता है जिससे हमें कंडीशन के आधार पर निर्णय लेने में सुविधा होती है ।

  13. टैली विभिन्न अकाउंटिंग अनुपातों की गणना करने में सक्षम है जो कार्य-निष्पादन की निगरानी करने में सहायता करते है और शीर्घ एवं सही निर्णय लेने में सक्षम बनाते है।

  14. यह हमें लागत और लाभ केद्र का विश्लेषण (cost center analysis) करने में सक्षम बनाता है। यह टैली के सबसे उपयागी फीचर्स मे से एक है ।

Golden Rules of Accounts
(अकाउंटिंग के नियम)

Transaction करते समय, हमें डेबिट या क्रेडिट साइड का फैसला करना होता है। इसके निम्नलिखित नियम हैं –

Personal Accounts  (व्यक्तिगत खाते )

पाने वाले को डेबिट

देने वाले को क्रेडिट

Debit : The Receiver or Debtor

Credit : The Giver or Creditor

Real Accounts(वस्तुगत खाते )

जो वस्तु व्यापार में आए उसे डेबिट करो

जो वस्तु व्यापार से जाए उसे क्रेडिट  करो

Debit : What comes in

Credit : What goes out

Nominal Accounts(नाममात्र के खाते )

समस्त प्रकार के खर्चे और हानियों को डेबिट करो

समस्त प्रकार के आय  और लाभों को क्रेडिट  करो

Debit : All Expenses & Losses

Credit : All Incomes & Gains

Tally screen components
(टैली स्क्रीन कोम्पोंनेट )

टैली में कार्य प्रारंभ करने के पूर्व टैली स्क्रीन के विभिन्न कंपोनेंट्स के साथ अपने आपको परिचित कर लेना अत्यंत महत्वपूर्ण है। इस स्क्रीन  में शामिल विभिन्न कम्पोनेंट्स निम्नानुसार होते हैं।

1. Title Bar :- Tally का Version दिखाता है ।

2. Horizontal button bar :– Language key,Key board  और Tally help को select करने का आप्शन  प्रोवाइड करता है।

3. Minimise button :- स्टैंडर्ड विंडोज आपरेटिंग सिस्टम्स फंक्शन निष्पादित करता है, हमें टैली को मिनिमाइज करने और अन्य एप्लिकेशन्स पर कार्य करने की  अनुमति देता है। टैली को रीस्टोर करने के लिए टास्कबार पर टैली के आइकॉन को क्लिक करें।

4. Gateway of Tally :- मेन्यूज, स्क्रीन्स, रिपोर्टस् प्रदर्शित करता है तथा उन विकल्पों व आंप्शन्स को स्वीकार करता है,जिन्हें हम डेटा
को अपनी इच्छानुसार देखने हेतु चुनते हैं।

5. Button tool bar :- टैली के साथ त्वरित सहभागिता प्रदान करने वाले बटन्स दर्शाता है। केवल वे ही बटन्स दिखाई देते हैं जो वर्तमान कार्य से संबंधित होते हैं।

6. Calculator  :- कैलक्यूलेटर का प्रयोग कैलकुलेशन करने के लिए किया जाता है।

7. Bottom Pen :- Version , रिलीज संबंधी डिटेल , वर्तमान दिनांक व सिस्टम टाईम दर्शाता है।

8. Language Button :– यूजर को लैंग्वेज कॉन्फ़िगर करने की अनुमति देता है।

9. Keyboard Button :- यूजर को फोनेटिक कीबोर्ड हेतु लैंग्वेज कॉन्फ़िगर करने की अनुमति देता है।


टैली में लैंग्वेज ऑप्शन का प्रयोग कैसे करें
(How to change Language in Tally.ERP 9)

दोस्तों क्या आप जानते है की आप टैली को अलग अलग भाषाओ में प्रयोग कर सकते हैं टैली में कुछ पहले से इनस्टॉल लैंग्वेज होती हैं टैली 13 Local Language को सपोर्ट करता हैं।

  • Arabic
  • Indonesia Bahasa
  • Bahasa Melayu
  • Punjabi
  • Bengali
  • Gujarati
  • Hindi
  • Hinglish
  • Kannada
  • Malayalam
  • Marathi
  • Tamil
  • Tally.ERP 9 में Language को activate करने के लिए, Tally.ERP 9 के top button bar पर दिए गए Language बटन पर क्लिक करें या Alt + G प्रेस करे|
Language की list प्रदर्शित की जाएगी।
यहाँ से आप वह लैंग्वेज सिलेक्ट कर सकते है जो आप चाहते है |
  • यदि यह बटन काम नहीं करता तो Tally.ERP 9 में Multi Language सपोर्ट को activate करने के लिए निम्न चरण का प्रयास करें।

आप Tally.ERP 9 में Language को enable करके अपनी पसंद की Language में Tally.ERP 9 का उपयोग कर सकते हैं।

  • Language Dictionary डाउनलोड करें
  • अपने Tally.ERP 9 install फ़ोल्डर में जाएं।
  • एक नया फ़ोल्डर Lang नाम का बनाएं।
  • जिस Language में आप Tally.ERP 9 का उपयोग करना चाहते हैं, उसकी DCT फाइल डाउनलोड करें। उदाहरण के लिए, कन्नड़ में Tally.ERP 9 का उपयोग करने के लिए kannada.dct डाउनलोड करें।

नोट: आप एक से अधिक Languages में Tally.ERP 9 का उपयोग करने के लिए कई DCT फ़ाइलों को डाउनलोड कर सकते हैं।

  • इस फाइल को Lang फोल्डर में कॉपी और पेस्ट करें।
  • Tally.ERP 9 फ़ोल्डर से Tally.ini फ़ाइल खोलें।
.DCT फ़ाइल के स्थान के लिए LangPath attribute की वैल्यू बदलें, जैसा कि नीचे दिखाया गया है:
.अब आप अपनी पसंद की Language में Tally.ERP 9 का उपयोग करने के लिए tally.exe चला सकते हैं।


Translate in english

What is tally


 Account is very important in our life.  In order to prepare and maintain records in business, it is quite necessary for businessmen to prepare various accounts in government offices and for businessmen.  Accounting is as important to everyone as money.


 Tally means to do accounting, to count, to organize and to keep records. The said goods came from what was spent on how much was spent today. How much of the goods were extracted, who did all these things come under the tally.


 Tally is an accounting software, Tally Solutions Pvt.  Ltd is a computer software manufactured by a multinational Indian company. In general speaking tally is associated with accounting, accounting is the writing of financial transactions (income / expenses) of a company in its business.  In earlier times it is written by hand in books, with the change of time, computers are used today to maintain a company's account.


 When it comes to accounting in computers, the only software that comes in mind is Tally.  The main office of the Tally Provider Company, which keeps business practices and accounts saved on the computer, is in Bangalore.  Tally software is very popular in many countries other than India, Tally is the most important aspect in business management.


 In the Book Register diary, we organize everything by drawing a column with a scale pencil and keeping a calculator for counting. Instead of all this, a software is found on the computer on which the graph can be created without any hassle.  Checking, accounting, keeping records can all be done easily. That is the tally.


 Such as the payment of the employees of the company, income expenditure on the company's resources, various bank accounts, transaction records, all these are the tasks of the tally.

 With the expansion of types of business, the development and use of tally is also different and easy.


 Tally is the most popular financial accounting software in India and abroad.  It has earned a reputation among chartered accountants, auditors and other financial institutions for its easy-to-use, simplicity, user-friendliness and reliability.  Tally is being used by almost every company from small business to large establishment for its accounting purpose.  They want employees who know how to use computers and are trained in tally.  Traditional ledger writing methods have been completely replaced with tally.


 The initial release of Tally was Tally 4.5 version.  This Dos based software was released in the early 1990s.  It was the basic financial accounting tool.  In those days personal computers were gaining popularity in India.  Peutronics (the company developing Tally) took advantage of this opportunity and introduced its Tally 4.5 version in the market.  The auditors and accountants who used to account for the huge amount of thick bound books, were surprised to see Tally's ability to calculate balance sheets and profit-and-loss accounts within a few moments.  To do all this, all we have to do is to create the ledgers and enter the vouchers.  Tally does the remaining work.  He will create all the statements, trial balance and balance sheet for us.


 Tally 5.4, Tally 6.3, Tally 7.2 Tally 8.1 and Tally 9.0 versions were released later.  Under these editions, the inventory used for stock management of the company, support for payroll used for wage calculation and wage payments of workers and for Hindi, Tamil, Telugu, Kannada, Malayalam, Gujarati, Marathi and many other Indian languages.  Multilingual support is included for.


 What is Accounting

 (What is accounting?)


 The size of modern business has become so vast that hundreds, thousands and thousands of business transactions take place in it.  It is impossible to conduct a business venture remembering the details of these transactions.  Therefore, the serialized records of these transactions are kept and their systematic knowledge and experimentation is called accounting.  The practical form of accounting can be called accounting.  According to the Bulletin, the accounting terminology of the American Institute of Certified Public Accountants (AICPA), "accounting can effectively write, classify and summarize behaviors and events that are at least partly financial in nature" as currency.  And there is the art of interpreting their results. ''


 According to this definition accounting is an art, not a science.  This art is used to record, classify, summarize and interpret measurable behaviors and events in a currency of a financial nature.


 Accounting is the art of keeping a record, summarizing, reporting and analyzing the financial transactions of a business.  The person taking over the accounting is known as an accountant and the role of an accountant is similar to that of a record-keeper.  However, accounting is now considered to be a tool of management that provides important information about the future of the organization.


 Smith and Ashburn have presented the above definition with some improvement.  According to him, 'accounting is primarily the science of recording and classifying business transactions and events of a financial nature and is the art of making, summarizing, analyzing and interpreting those transactions and events and communicating the results to the individuals who have to make decisions.  According to this definition, accounting is both science and art.  But it is almost a complete science rather than a full-fledged science.


 Features of Tally

 (Features of Tally)


 In this world of competition and growing business, where Tally has crossed all limits, it has become one of the best, reliable, fastest accounting software that meets the business complexity accounting requirements.  Tally is one of the most powerful, multilingual and business accounting software that helps in publishing and recording various accounting stocks and other most reports at the click of a single button.  The various features and benefits of this unique accounting software are as follows.


 Tally is very easy to use as it enables quick (instant) data entry and accounting information at blink speed.


 This enables the user to record, view and generate accounting records in the selected language.  This is one of the important features of Tally.


 This allows the record of 99999 companies to be protected simultaneously.


 One of the major features of Tally is that it enables creation of reports for companies where accounts of multiple locations are managed.


 More than one detailed data is equivalent and updated by Tally.


 Tally assists in better cash flow by ensuring collection reminders which also helps in saving interest.


 Tally enables to identify bad debaters and defaulters in terms of payment.


 Tally helps us in managing the inventory of the company which is able to find the inventory level according to the product and is also able to find the reorder level for different products at the level fixed by the user.


 Features of Tally include preparation of cost benefit analysis by product and by invoice.


 One of the useful benefits of Tally is that it enables us to understand and analyze performance levels for multiple periods.  This enables us to understand customer buying patterns.


 It is capable of tracking (monitoring) of stocks.


 This enables us to monitor more than one warehouse location, allowing us to make decisions based on the condition.


 Tally is able to calculate various accounting ratios that help monitor performance and enable quicker and correct decisions.


 This enables us to do a cost center analysis.  This is one of the most useful features of Tally.


 Golden Rules of Accounts

 (Accounting rules)


 While transacting, we have to decide the debit or credit side.  It has the following rules -


 Personal Accounts


 Payee debit


 Credit to the giver


 Debit: The Receiver or Debtor


 Credit: The Giver or Creditor


 Real Accounts


 Debit the item that comes into business


 Credit what goes into merchandise


 Debit: What comes in


 Credit: What goes out


 Nominal Accounts (nominal accounts)


 Debit all kinds of expenses and losses


 Credit all types of income and benefits


 Debit: All Expenses & Losses


 Credit: All Incomes & Gains


 Tally screen components

 (Tally Screen Component)


 It is very important to familiarize yourself with the different components of the tally screen before starting the work in the tally.  The various components included in this screen are as follows.


 1. Title Bar: - Shows the version of Tally.


 2. Horizontal button bar: - Provides option to select language key, key board and Tally help.


 3. Minimize button: - Performs the standard Windows Operating Systems function, allowing us to minimize tally and work on other applications.  To restore the tally, click the tally icon on the taskbar.


 4. Gateway of Tally: - Displays menus, screens, reports and accepts the options and options that we data

 Choose to see as you wish.


 5. Button tool bar: - Shows buttons that provide quick interaction with Tally.  Only those buttons appear which are related to the current work.


 6. Calculator: - The calculator is used for calculating.


 7. Bottom Pen: - Version shows the release details, current date and system time.


 8. Language Button: - Allows the user to configure the language.


 9. Keyboard Button: - Allows the user to configure the language for the phonetic keyboard.


 4


 How to use the language option in Tally

 (How to change Language in Tally.ERP 9)


 Friends, do you know that you can use Tally in different languages? Tally has some pre-installed languages. Tally 13 supports Local Language.


 Arabic


 Indonesia Bahasa


 Bahasa melayu


 Punjabi


 Bengali


 Gujarati


 Hindi


 Hinglish


 Kannada


 Malayalam


 Marathi


 Tamil


 4


 To activate the language in Tally.ERP 9, click on the language button on the top button bar of Tally.ERP 9 or press Alt + G.


 A list of languages ​​will be displayed. From here you can select the language you want.


 If this button does not work, try the following step to activate Multi Language Support in Tally.ERP 9.


 You can use Tally.ERP 9 in the language of your choice by enabling the language in Tally.ERP 9.


 Download Language Dictionary


 Go to your Tally.ERP 9 install folder.


 Create a new folder named Lang.


 Download the DCT file of the language in which you want to use Tally.ERP 9.  For example, to use Tally.ERP 9 in Kannada download kannada.dct.


 Note: You can download multiple DCT files to use Tally.ERP 9 in more than one language.


 Copy and paste this file into the Lang folder.


 Open the Tally.ini file from the Tally.ERP 9 folder.


 Change the value of the LangPath attribute to the location of the .DCT file, as shown below:. Now you can run tally.exe to use Tally.ERP 9 in the language of your choice.


Tally मे कंपनी कैसे बनाए? how to create company in tally

इंडिया मे जीएसटी के आने से अकाउंट की परिभाषा ही बदल सी गयी है । अगर आप कोई बिज़नेस करते है , तो क्या आप अपने  बिज़नेस मे प्रतिदिन के लेंन -देन को किस तरह से करते है? आज हर एक छोटे, बड़े दुकानदार को अपना अकाउंट मैंटेन करने की जरूरत पड़ती है, ऐसे मे जो अकाउंटिंग सॉफ्टवेर का नाम सबसे पहले आता है वो है Tally ERP 9.  Tally ERP 9 मार्केट मे नंबर  1 अकाउंटिंग सॉफ्टवेर मे से एक  हैं, जिसकी मदद  हम अपने अकाउंट  को आसानी से मैंटेन कर सकते है। आज के इस पोस्ट मे मैं आपको ये बताउगा की टैली मे कंपनी कैसे बनाए? Tally Me Company Kaise Banaye? और उस  Company Me Alteration Kaise Kare, Tally Me Company Ko Delete Kaise Kare, आज के इस पोस्ट मे हम इन सभी टॉपिक पर वार्तालाप करेगे, तो चलिये शुरू करते है। 

Tally मे कंपनी कैसे बनाए? पूरी जानकारी जाने ? how to create company in tally

टैली की उपयोगिता तब से कुछ अधिक बढ़ सी गई, जब से इंडिया मे जीएसटी लागू किया गया  आज हर एक आदमी/दुकानदार/कंपनी/फ़र्म आदि को अपने बिज़नेस मे अकाउंट का हिसाब किताब रखने के लिए किसी न किसी अकाउंटिंग सॉफ्टवेर की जरूरत पड़ती ही है। और जबकि हम जानते है की टैली एक प्रसिद्ध अकाउंटिंग सॉफ्टवेर है, जिसकी मदद से आप अपने बिज़नेस का हिसाब किताब बहुत ही आसानी से रख सकते है। आज के इस पोस्ट मे मैं आपको बताउगा की टैली मे कंपनी कैसे बनाए?

Tally ERP 9 मे कंपनी बनाने के लिए कुछ आसान तरीको को फॉलो करना पड़ेगा जो की कुछ इस प्रकार से है॥ आइये जानते है

STEP:1  सबसे पहले आप  Tally ERP 9 सॉफ्टवेर को open करे।

STEP:2 Tally ERP 9 Software को खोलने पर आप सभी को एक विंडो दिखाई देगी। आप यहा पर टैली को 2 प्रकार से उपयोग कर सकते है। पहला Licence Version और दूसरा  Educational Mode। आइये जानते है की Licence Version Aur Educational Mode  आखिर क्या है।

Educational Mode क्या है? इसका कैसे उपयोग करे

Educational Mode का उपयोग करने के लिए सबसे पहले आपको नीचे Work In Educational Mode के ऑप्शन पर क्लिक करना होगा, या फिर आप अपने कीबोर्ड से (W) को दबाये, जैसे ही आप (W) को दबाएगे, टैली सॉफ्टवेर खुल जाएगा।

Educational Mode मे आप बस Education Purpuse मतलब की सिर्फ सीखने के लिए ही अकाउंटिंग एंट्रीस को कर सकते है, आप Educational Mode मे प्रतिदिन की लेन-देन की एंट्रीस को नहीं कर सकते है बस आप महीने की (1 or 2) तारीख या महीने की अंतिम तारीख की एंट्री को ही कर सकते है क्यूकी Educational Mode केवल सीखने के उदेश्य से बनाया गया है यहा आप अकाउंटिंग की सभी एंट्री कर सकते है बस आपको अगर टैली  को पूरा उपयोग करना है तो आपको टैली  सॉफ्टवेयर खरीदना पड़ेगा। Educational Mode tally

License Mode क्या है? इसका कैसे उपयोग करे

Tally ERP 9 के  License Version को अगर आप खरीद लेते है तो उसमे आपको अपने बिज़नस के प्रतिदिन की सभी एंट्रीस को करने की सुविधा मिल जाती है मतलब की आप किसी भी दिन/तारीख की एंट्री को टैली मे आसानी से कर सकते है साथ ही साथ आप Tally solutions के  Online Server से भी जुड़ जाते है, जिस से आप कंपनी से कभी भी मदद ले सकते है और आपको ऑनलाइन काफी सुविधा प्रदान की जाती है।

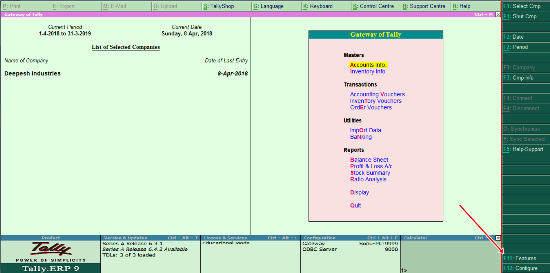
STEP:3   Tally Open होने के बाद आपको Company Info का  एक ऑप्शन दिखाई देगा अगर आपको Company Info की मेनू नहीं दिखाई देती है तो आप अपने कीबोर्ड से (Alt+F3) बटन को दबाये आपके सामने Company Info की मीनू शो होगी। अब आप Company Info के ऑप्शन पर क्लिक करे यहा पर आपको Create Company  का ऑप्शन दिखाई देगा आपको नई कंपनी बनाने के लिए Create Company के ऑप्शन पर क्लिक करना होगा।  create company tally

Company Creation Window को विस्तार मे जानते है, की इनमे कौन-कौन सी Fields है  

company creation in Tally

Company Create करने के लिए आपको कुछ Required Field को भरना होगा, आइये उन सारे Procedure को विस्तारपूर्वक चर्चा करते है. 

  • Directory:- Directory मतलब वो Path जहा हम अपनी कंपनी के डाटा को सेव करके रखते है, जब भी हम टैली सॉफ्टवेर को इन्स्टाल करते है तो हमे उसे एक Path देना होता है, टैली By Default C Drive मे सारा डाटा सेव करके रखता है आप इस Path को किसी और Location मे भी स्टोर कर सकते है।

  • Name: Name Option मे हम जो भी कंपनी बनाना चाहते है उस कंपनी का पूरा नाम लिखेगे।

  • Mailing Name: इसमे भी हम उसी कंपनी का पूरा नाम लिखेगे अगर आप कोई और नाम लिखना चाहते है तो वो लिख सकते है।

  • Address: Address के option मे हम उस कंपनी का पूरा पता लिखेगे

  • Country: Country मे हम India को  Select करेगे, अगर आप किसी और देश मे रहते है तो आप उस देश को Select करे।

  • Phone No: Company का Phone No भरे।

  • Mobile No: Mobile No Ke Option मे Mobile No भरे।

  • Fax No: Company का  Fax No अगर हो तो उसको भरे वरना  Skip करके आगे बढ़ जाए।

  • E-Mail: Company का जो भी  E-Mail Address हो उसको भरे।

  • Website: अगर  Company की कोई Website हो तो उस Website का पूरा Address यहा पर भरे।

  • Financial Year Begins From: इसका  मतलब की आपका  Financial Year कब से सुरू होता है इसकी जानकारी यहा पर भरे, जैसा की हम जानते है की Financial Year (1 April)  से सुरू होता है और  (31 March) को खतम होता है।

  • Books Begin From: इसका मतलब ये है की आपको एंट्री कब से करनी है इस ऑप्शन मे हम वही Financial Year वाली ही तारीख को ही रहने देगे कोई बदलाव नहीं करेगे। wa

  • Tally Vault Password(if Any): अगर आपको Tally मे Password लगाना है तो आप इस ऑप्शन की मदद से टैली मे आसानी से Password Create कर सकते है।
    Repeat Password: Repeat Password मे वही  Password को पुनः भरे जो भी Password आपने भरा है।

  • Use Security Control: अगर आप Security Control को Yes करना चाहते है तो कर सकते है यहा भी आप अपनी मर्जी के अनुसार Security लगा सकते है।

  • Base Currency Symbol: इसमे आप Rs को सेलेक्ट करे क्यूकी भारत का Rs सिम्बल है।

  • Formal Name: इसमे आप Rupee को सेलेक्ट करे।

अब और जो भी Details है, उन सभी को skip करके आगे बढ़ जाए, अब आपको एक ऑप्शन दिखाई देगा जिसमे लिखा होगा yes/no आप येस के ऑप्शन पर क्लिक करके कंपनी को सेव कर लीजिये। अंतता आपको कंपनी सफलतापूर्वक बन चुकी है।

Tally मे कंपनी  Details को  Alter (Modify) करना :-

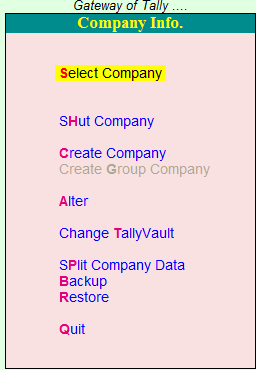
Tally मे कंपनी की किसी भी जानकारी को  Modify करने के लिए हमे अपने कीबोर्ड से (Alt+F3) बटन को दबाना होगा, जैसे ही आप (Alt+f3) बटन को Press करेगे आपके सामने एक मेनू खुल जाएगी, आइये इस मेनू के बारे मे विस्तारपूर्वक जानकारी दे। alter company

  • Shut Company: Shut Company मतलब ये है की अगर आपको कंपनी को बन्द करना चाहते हैं तो आप Shut Company ऑप्शन का उपयोग कर सकते है। .

  • Create Company: इस ऑप्शन के जरिये आप New Company Create कर सकते है।

  • Alter: Alter  ऑप्शन का उपयोग कंपनी की जानकारी को Modification मतलब बदलने के लिए किया जाता है। Alter Option का उपयोग हम कंपनी को Delete  करने के लिए भी करते है

  • Change Tally Vault: इस ऑप्शन के जरिये हम Tally Vault password को आसानी से बादल सकते है।

  • Split Company Data: हम कभी -2 एक ही कंपनी मे कई सारे  Financial Year के साथ काम करते है तो इस ऑप्शन के जरिये आप कंपनी के डाटा को Split कर सकते है जिस से हमे काम करने मे आसानी होती है।

  •  Backup: इस ऑप्शन के जरिये हम अपनी कंपनी के डाटा का  Backup आसानी से ले सकते है।

  • Restore: इसके जरिये हम बैकप लिए हुये डाटा को पुनः Restore कर सकते है।

  • Quit: Quit ऑप्शन की मदद से हम कंपनी से बाहर आ सकते है।

Tally मे कंपनी को  Modify (Edit), कैसे करे ?

Tally मे कंपनी को  Modify मतलब किसी भी डाटा को बदलने के लिए सबसे पहले आपको  Company Info  मे  Alter के  ऑप्शन मे जाना होगा और जो भी Alteration आपको अपनी कंपनी मे करना है उसे सेव करे और डिटेल्स को Modify करने बाद कंपनी को सेव कर दे। Company को सेव करने के लिए Shortcut Key (Ctrl+A) का यूस करे।

Tally मे कंपनी को Delete कैसे करे ? how to delete company in tally

Tally मे कंपनी को Delete  करने के लिए आपको Company Info मे  Alter के ऑप्शन मे जाना होगा और आपको अपने कीबोर्ड से ( ALT+D)  कुंजी को दबाना होगा , जैसे ही आप ALT+D कुंजी को दबाएगे आपके सामने एक मेनू खुल जाएगी आपको कंपनी को डिलीट करने के लिए सिर्फ Yes के बटन पर क्लिक करना होगा, जैसे ही आप Yes पर क्लिक करेगे आपकी कंपनी डिलीट हो जाएगी । delete company

Tally मे कंपनी को Shut (Close) कैसे करे ? shut company in tally

Tally मे कंपनी को  Shut मतलब की Close(बन्द ) करने के लिए आप अपने Right Side मे Close बटन पर क्लिक करके आसानी से कंपनी को बन्द कर सकते है या फिर अपने कीबोर्ड से (Alt+F1) कुंजी को दबा कर कंपनी को बन्द कर सकते है।

अंतता आप टैली मे कई सारे कामो को बहुत ही आसानी से कर सकते है जैसे कंपनी बनाना , कंपनी डिलीट करना , कंपनी के डाटा को बदलना इत्यादि। और आधिक जनकरी के लिए आप  Tally की  Official Website पर जाकर सभी जानकारी को प्राप्त कर सकते है। जैसे – Tally सॉफ्टवेर को Download कैसे करे,  Tally ERP 9 सॉफ्टवेर का Price क्या है.


Translate in english

With the introduction of GST in India, the definition of account has been changed.  If you do a business, how do you do the daily transactions in your business?  Today, every small and big shopkeeper needs to maintain his account, the accounting software name that comes first is Tally ERP 9. Tally ERP 9 is one of the number 1 accounting software in the market, which helps  We can easily maintain our account.  In today's post, I will tell you how to form a company in Tally?  Tally Me Company Kaise Banaye?  And in that post of today's Company Me Alteration Kaise Kare, Tally Me Company Ko Delete Kaise Kare, we will discuss all these topics, so let's start.


 How to create a company in Tally?  Know full details?  how to create company in tally


 The utility of Tally has increased a lot since GST was implemented in India. Today every man / shopkeeper / company / firm etc. needs some accounting software to keep track of accounts in their business.  is.  And while we know that Tally is a famous accounting software, with the help of which you can keep a record of your business very easily.  In today's post, I will tell you how to form a company in Tally?


 To create a company in Tally ERP 9, some simple methods have to be followed, which is something like this.  Let's know


 STEP: 1 First of all you open the Tally ERP 9 software.


 STEP: 2 When you open Tally ERP 9 Software, all of you will see a window.  You can use Tally in 2 ways here.  First License Version and Second Educational Mode.  Let us know what is the License Version Aur Educational Mode.


 What is educational mode?  How to use it


 To use Educational Mode, first you have to click on the option of Work In Educational Mode below, or else you press (W) from your keyboard, as soon as you press (W), the Tally software will open.


 In Educational mode, you can just do Education Purpuse which means you can do the accounting entry only for learning, you cannot do the entry of daily transaction in Educational Mode, just you can do the (1 or 2) date of the month or the month.  You can do the last date entry because the educational mode is designed for learning purpose only, here you can do all the accounting entries, if you want to use the tally fully, then you have to buy the tally software.  4


 What is License Mode?  How to use it


 If you buy the License Version of Tally ERP 9, then you get the facility to do all the daily entries of your business, meaning that you can easily enter any day / date entry in the tally as well.  You also get connected to Tally solutions online server, from which you can take help from the company anytime and you are provided with a lot of convenience online.


 STEP: 3 After Tally Open, you will see an option of Company Info. If you do not see the menu of Company Info, then you press the (Alt + F3) button from your keyboard, you will see the menu of Company Info in front of you.  Now you click on the option of Company Info, here you will see the option of Create Company, you will have to click on the option of Create Company to create a new company.  4


 Company Creation Window knows in detail which are the Fields in them.


 4


 To create a company, you have to fill some required fields, let's discuss all those procedures in detail.


 Directory: - Directory means the path where we save the data of our company, whenever we install Tally software, we have to provide a path to it, Tally By Default keeps all the data saved in C Drive.  You can store this path in any other location as well.


 In Name: Name Option, we will write the full name of the company that you want to create.


 Mailing Name: In this also we will write the full name of the same company, if you want to write another name, then they can write it.


 Address: In the option of Address, we will write the complete address of that company


 In Country: Country, we will select India, if you live in some other country, then you select that country.


 Phone No: Fill the Company's Phone No.


 Mobile No: Fill Mobile No in Mobile No Ke Option.


 Fax No: Fax No of the company, if filled then leave it and proceed.


 E-Mail: Fill in the E-Mail address of the company.


 Website: If the company has a website, then fill the full address of that website here.


 Financial Year Begins From: This means that when your financial year starts, fill in the information here, as we know that the financial year starts from (1 April) and ends on (31 March).


 Books Begin From: This means that when you have to make an entry, in this option, we will keep the same financial year on the same date and will not make any changes.  wa


 Tally Vault Password (if Any): If you want to enter a password in Tally, then you can easily create a password in Tally with the help of this option.

 Repeat Password: In Repeat Password, re-fill the same password whatever password you have filled.


 Use Security Control: If you want to Yes to Security Control then you can do it here, you can install security as per your wish.


 Base Currency Symbol: In this, you can select Rs, because Rs is the symbol of India.


 Formal Name: In this, you select the Rupee.


 Now skip all the details and go ahead, now you will see an option that says yes / no, you can click on the option and save the company.  Finally you have successfully become a company.


 Alter (Modify) Company Details in Tally: -


 In order to modify any information of the company in Tally, we have to press the (Alt + F3) button from our keyboard, as soon as you press the (Alt + f3) button, a menu will open in front of you, let's talk about this menu.  Please give me detailed information.  4


 Shut Company: Shut Company means if you want to shut down the company then you can use the Shut Company option.  .


 Create Company: Through this option you can create a new company.


 Alter: The Alter option is used to change the company's information to mean Modification.  We also use Alter Option to delete the company.


 Change Tally Vault: Through this option we can easily cloud Tally Vault password.


 Split Company Data: We sometimes work with many financial year in same company, so through this option you can split company data, which makes us easy to work.


 Backup: Through this option, we can easily take backup of our company's data.


 Restore: Through this we can restore the backed up data again.


 Quit: With the help of the Quit option, we can come out of the company.


 How to Modify (Edit) the company in Tally?


 To modify any data in the Tally company, first of all you have to go to the option of Alter in Company Info and save whatever Alteration you have to do in your company and after modifying the details, save the company.  Use the Shortcut Key (Ctrl + A) to save the company.


 How to delete a company in Tally?  how to delete company in tally


 To delete a company in Tally, you have to go to the option of Alter in Company Info and you have to press the (ALT + D) key from your keyboard, as soon as you press the ALT + D key a menu will open in front of you.  To delete, just click on the Yes button, your company will be deleted as soon as you click Yes.  4


 How to Shut (Close) a Company in Tally?  shut company in tally


 To close (shut) the company in Tally, you can easily close the company by clicking on the Close button in your right side or by pressing the (Alt + F1) key from your keyboard.  Can.


 Finally, you can do many things in the tally very easily like creating a company, deleting a company, changing company data, etc.  And for more Janakari, you can get all the information by visiting the official website of Tally.  Like - how to download Tally software, what is the price of Tally ERP 9 software.


Tally Me Stock Entry Kaise Kare? Aaiye Janate Hai

Tally ERP 9 Ka Use Hum Agar Apne Accounts Ko Maintain karne Ke Liye Karte Hai Magar Dakha Jaye To Tally Me Hum Bahut Sare Kaam Ko kar Sakte hai. Apne Business Me Stock Ko Maintain Karna Bahut Hi Jada Jaruri hai Isliye Aaj Mai Aapko Ye Batauga Ki Tally Me Stock Entry Kaise kare? Tally me Hum Apne Stock Ko Kis Tarah Se Maintain kar Sakte Hai, Iske Bare Me Puri Janakri Duga. Toh Aaiye Janante Hai.

Tally Me Stock Entry karne Ke Liye Aur Apne Stock Ko Maine Karne Ke Liye Aapko Sabse pahle ye Janana Bahut Hi Jaruri Hai Ki Stock Group Kya hai, Stock Items Kya Hai, Stock units Kya hai, Stock Items, Stock Groups, Unis Etc Ko Tally Me Kaise Create karte hai? Jab Tak Aap In Sab Chijo Ko Nahi Janege, Tab Tak Aap Tally ERp 9 Me Stock  Ki Entry Nahi kar Sakege. Toh Aaiye Janate Hai.

Tally Me Stock Entry Kaise Kare? Aaiye Janate Hai

Tally Me Stock Ki Entry Karne Ke Liye Aapko Kuch Simple Steps Ko follow Karne Padege.

STEP:1- Sabse Pahle Aap Tally ERP 9 Software Ko Open Kare.

STEP:2- Ab Aapko Stock Ki Entry Karni hai, Toh Uske Liye Aap Sabse Pahle Stock Create Kar Le.

Example Ke Liye Maine Keyboard, Mouse, Monitor Aur Memory card Ye 4 Stock Items create Kar Liye hai, Kyuki Stock Ke Entry Karne Ke Liye Aapke pas Stock Items Hone Chahiye Tabhi To Aap Stock Entry Kar Payege.

Aaiye Aapko Stock Items Kaise create kare Use Batata hu.

Keyboard Ke Liye Is Tarah Stock Item Create Kare

keyboard

Mouse Ke Liye Is Tarah Stock Item Create Kare

mouse

Monitor Ke Liye Is Tarah Stock Item Create Kare

moniter

Memory Card Ke Liye Is Tarah Stock Item Create Kare

memory card

STEP:3- Stock Items Ko create Karne Ke Baad Aapko Stock Entry Ke Liye Accounting Voucher Par Aana Hoga.

STEP:4- Accounting Voucher Ko Open Karne Ke Baad Aap Apne Keyboard Se F8 Button Press Karke Sale Voucher Ko Open Kar Le. Kyuki Entry Karne Ke Liye Hum Vouchers Ka Hi Use Karte Hai Aur Hum Yaha par Stock Entry Karne Ke Liye Sale Voucher Ka Use Karege.

Sale Voucher Aapko Kuch Is Tarah Se Show Hoga.

sale voucher

STEP:5- Sale Voucher Open Karne Ke Baad Stock Entry Karne Ke Liye Kuch Simple Steps Ko Follow Kare.

Stock Entry Is Tarah Se Kare Follow This Screenshot

Stock Entry

1: Sale No 1 :- Yaha par Pahle Se hi Sale No Aapko Show Hoga.

2: Date:- Aapko Dis Bhi date Ki Entry Karni Hai Us Date Ko fill kare.

3: Reference No:- Reference No Ko Hi Hum Bill No Bhi Kahate Hai, Aapko Yaha Ek Reference No fill karna hai.

4: Party A/c Name:- Aapko Ek Party Create Karni Hai Jise Aap Goods Ko Sale kar Rahe Hai. Party Create Karne Ke Liye Apne keyboard Se Alt+C Press kare Ab Aapke Samne Ledger Creation Ki Window open Ho Jaegi, Aapko Jo Bhi party Create Karni Hai, Uska Ledger Banaye.

Agar Aap Ledger Create Karna Nahi Janate Hai, Toh Is Post Ko Read Kare?

5: Sales Ledger:- Aapko Sales ka Bhi Ek Ledger create Karna Hoga, Kyuki Aap Goods Ko Sale kar Rahe Hai To Sale Ka Ledger hona Important Hai.

Ab Aapko Name Of Item Show Hoga, Aapko Yaha par Stock Ki Entry karni hai, Jo-2 Stock Aapne Create Kiya Hai. Aaiye Entry karte Hai.

Sabse Pahle Aapne Jo Stock Create Kiya Hai Usko Select Kare, Humne Keyboard, Mouse, Monitor Aur Memory Card Naam ka Stock Items ko Create Kiya Hai.

Keyboard Item ko Select Kare, Aur Kitni Quantity Sale Karni hai Wo Fill Kare, Kis Rate Se Sale Karni hai Wo Rate fillup Kare. jaise Hi Aap  Rate And Quantity fillup Karege Tally Automatic Taxable Amount Show Kar Dega Aapki Screen par. Yaha Ab Aapko Keyboard Ki Total Value Show Ho Rahi Hogi.

Ab Aap Mouse Item ko Select Kare, Aur Kitni Quantity Sale Karni hai Wo Fill Kare, Kis Rate Se Sale Karni hai Wo Rate fillup Kare. jaise Hi Aap Rate And Quantity fillup Karege Tally Automatic Taxable Amount Show Kar Dega Aapki Screen par. Yaha Ab Aapko Mouse Ki Total Value Show Ho Rahi Hogi

Monitor Item ko Select Kare, Aur Kitni Quantity Sale Karni hai Wo Fill Kare, Kis Rate Se Sale Karni hai Wo Rate fillup Kare. jaise Hi Aap Rate And Quantity fillup Karege Tally Automatic Taxable Amount Show Kar Dega Aapki Screen par. Yaha Ab Aapko Monitor Ki Total Value Show Ho Rahi Hogi

Ab last me Aap Memory Card Naam Ke  Item ko Select Kare, Aur Kitni Quantity Sale Karni hai Wo Fill Kare, Kis Rate Se Sale Karni hai Wo Rate fillup Kare. jaise Hi Aap Rate And Quantity fillup Karege Tally Automatic Taxable Amount Show Kar Dega Aapki Screen par. Yaha Ab Aapko Memory card Ki Total Value Show Ho Rahi Hogi

Narration:- Agar Aapko Narration Me Kuch Fillup Karna Hai, Yaad Ke Liye Ki Aapne Is entry me Kya Kiya Tha, Toh Aap Narration Me Fill Kar Sakte Hai.

Sari Details Ko Fillup Karne Ke Baad Entry Ko Save Kar Le. Ab Aapne Tally me Stock Ki Entry Ko Successfully Karna Seekh Liya Hai, Mai Aapko ye Bata Du Ki Humne Only Ek Simple Entry Post Ki hai, Kyuki Is Entry Me Humne Koi Tax Charge nahi Kiya Hai.


Tally Me Stock Items Ko Kaise Banaye

Aaj Ke Badalte Hue Time Me Kya Aap Manually Stock Items Ko Ek Book Me Note Karke Rakhte Hai, Ya Phir Time Ke Sath Aapne Bhi (Tally ERP 9) Software Ka Use Karna Suru Kar Diya Hai. Manually Stock Items Ko Hum Pahle Ek Register Me Stock Items Ki Details Ko Note Karke Rakha Karte The, Magar (Tally ERP 9) Software Ke Aane Ke Baad Stock Items Ko Maintain Karna Kafi Aasan Ho Gaya Hai. Aaj Mai Aapko Batauga Ki Tally Me Stock Items Kya Hai. Tally Me Stock Items  Kaise Banaye? stock item creation in Tally

Stock Item Ka (Tally ERP 9) Me Kya Use Hai.Hamare Business Me Stock Item Ki Kya Importance Hoti Hai. Tally Me (Single And Multi Stock Items) Kya Hai Aur Inko Kaise Create Karte Hai. Jaisa Ki Hum Jante Hai Ki Tally Me Stock Group Create Karne Ke Baad Stock Items Ko Hum Create Karte Hai. Aaj Mai Aapke In Sabhi Sawale Ke Jawab Duga.

Stock Item Kya Hai?

Jin Bhi Chijo Ko Hum Apne Business Me Sale Ya Purchase Karte Hai Unko Hi Hum Stock Items Kahte Hai.Business Me Stock Item Ka Use Aksar  Len Den Me Kiya Jata Hai.

Tally Me Stock Items Ko Kaise Banaye?

Tally Me Stock Items Ko Banane Ke Liye Hamko Kuch STEPS Kom Follow Karna Padega.

STEP-1: Tally Me Stock Items Banane Ke Liye Gateway Of Tally Me Inventory Info Me Click Kare Phir  Stock Items Me Jake Click Kare Then Create Ke Option Par Click Kare.

process of stoc item create

STEP-2: Stock Item Me Name Ke Box Me Us Stock Item Ka Nam Likhege Jisko Hame Create Karna Hai. Example Hum Redmi Mobile Nam Ka Ek Stock Item Create Karte Hai.

Stock Item Create

STEP-3: Under Me Hum Us Stock Group Ko Select Karege, Jiske Under Me Redmi Mobile Aata Hai. Jaise Ki Hum Jante Hai Ki Redmi Mobile (Mobile) Nam Ke Stock Group Ke Under Aaega, To Hum Mobile Stock Group ko Under Option Me Select Karege.

Stock Item under

STEP-4: Units Sabse Pahle Jante Hai Unit Kya Hoti Hai Units Wo Hoti Hai Jiske Through Hum Kisi Bhi Chij Ke Napate Hai, Aur Har Vastu Ki Apni EK Alag Units Hoti Hai. Example-( Milk Ki Unit Hogi Liter Etc ), To Units Me Hum Ek Unit, Create Kar Lege, Ki Redmi Mobile Ko Kis Unit Me Sale Out Karna Hai. Maine Yaha Pieces (PCS) Name Ki Unit Create Ki Hui Hai.

Stock Item Unit

STEP-5: Opening Balance Agar Us Item Ka Koi Opening Balance Hoga To Uski Jo Bhi  Quantity,Rate(per) Aur Value Jo Bhi Hoga Us Ko Hum Dal Dege.

Stock Item quantity And Rate

Stock Items Ko Dakhna, Alter Karna Aur Delete Karna:

Stock Items ko Dakhne Ke Liye Gateway Of Tally Me Inventory Info me jake Stock Items Me Display Option Par Click Karege, To Aapne Jo Jo Bhi Stock Items ko Create Kiya hai wo Sabhi Stock Items Aapko Dikhai Dege.

Stock Items Ko Alter Karna:-

Stock Items ko Edit Karne Ke Liye Aapko Alter Option Me jake , Click Karna Hai .Waha par List Of stock Items Me Aapko Wo Items Ko select karna Hoga Jisko Alter Karna Hai To wo Item Open Ho Jaegi. Ab Aap Stock Items Ki Sari Details Ko Edit Kar Sakte Hai.

Stock Items Ko Delete Karna:-

Stock Items Ko Delete Karne Ke Liye Bhi Hamko Alter Option Me Jake, List me Jo Stock Item Ko Delete Karna Hai ,Usko select Karege Aur (Alt+D) Keyboard Se Press karege Wo Stock Item Delete Ho Jaegi.

Single Stock Items Kya Hain?

Tally Me Jab Ek Time Me, Ek Hi Stock Items Ko Hum Create Karte Hai To Usko Single Stock Items  Kahte Hai (As Like- Redmi Mobile Ko Create Karna)

Stock Item Single

Multi-Stock Items Kya Hain?

Multi-Stock Items Banane Ke Liye Gateway Of Tally Me Inventory Info Me Jake Stock Items Par Click Karege. Fir Multi Stock Item Me CREATE Par Click Karege, Uske Baad Ek Page Open Hoga Jisme Under Group Ke Option Me All Items Ko Select Karege. Uske Baad Name Of Item Me Wo Us Item Ka Nam Likhege Jisko Aapko Create Karna Hai. Under Ke Option Me Jo Stock Group Humne Create Kiya Hai Usko Select Karege, Fir Units Ke Option Me Hum Us Unit Select Karege, Jo Ki Us Stock item Ki Unit Hogi And Opening Quantity Agar Us Stock Item Ki Hogi, To Rate And Amount Ko Fill Karke Stock Item Ko Save Kar lege.

 Example Yaha Maine Kai Sare Multi Stock Items Ko Create Kiya Hai.

multiple Stock item create

Stock Category Kya Hai?

Stock Category Means Hamare Stock Ko Alag-2 Category Me Divide Karna Jaise- Tv Hamara Ek Stock Group Hai Aur T.v Kai Inches Me Market Me Aata Hai. Like( 25 Inch,32 Inch,40 Inch Etc) Hum Isi Ko Category Kahte Hai.

Means Stock Items Ko Alag Alag Category Me Divide Kar Dena Jis Se Hamko Apne Stock Ki Puri Knowledge Ho Sake Ki Hamare Business Me Kaun Sa Stock Item Hai Aur Wo Stock Item Kis Category Me Available Hai.

Tally Me Stock Category Option Ko Active Kaise Kare?

First Step: Tally Me Stock Category Option Pahle Se Active Nahi Hota Hai. User Ko Apni Suvidha Ke Anusar Is Option Ko Active Karna Hota Hai. Stock Category Option Ko Active Karne Ke Liye Gateway Of Tally Me Features Option Me Jaye Ya Phir Keyboard Se (f11) Botton Ko Press Kare

Feature option tally

Next Step: Yaha Inventory Features Par Click Kare.

inventory Features

Next Step: Uske Baad Inventory Se Related Window Open Hogi, Yaha Par Storage And Classification Option Me Aapko Maintain Stock Category Option Dikhega.  Is Option Ko Yes Kar De Aur Isko Save Kar Le. Save Karne Ke Liye (Ctrl+A) Keyboard Se Press karege, Ab Aapka Stock Category option Active Ho Gaya Hai.

stock categegory Features

Tally Me Stock Category Banana?

STEP-1: Tally Me Stock Category Option Ko Active Karne Ke Baad Gateway Of Tally Me Inventory Info Me Jaye Aur Yaha Aapko Stock Category Ka Option Dikhai Dega, Yaha Click Kare Aur Create Option Me Jake Click Kare.

Process of stock category

STEP-2: Yaha Aapko Stock Category Creation Ki window Dikhai Degi. Isme Name Me Hum Wo stock Category Ko Nam Likhege, Jisko Hamko Create Karna Hai. Suppose Hamko (Tv) Jo Ki Hamara Stock Group Tha, To Hamko Tv Ke Lie Stock Category Ko, Create Karna Chahate Hai, To Hum (32 Inches Sony Tv ) Ki Stock Category Create Kar Lege.

stock category banana

STEP-3: Under Me Hum Primary Option Ko Hi Select Karege Aur Yes Karke Save Kar Lege. Hamari Stock Category Create Ho Gai Hai.

stock category primary

Stock Group, Stock Category And Stock Items List With Example:-

S.No

Stock Groups

Stock Categories

Stock Items

1

T.v

19 inches

Sony

2

T.v

21 inches

LG

3

T.v

32 inches

Videocon

4

Laptop

15.6 Screen

Lenovo

5

Laptop

18.6 screen

Acer

6

Laptop

23.5 screen

HP

7

Fridge

21 inches Long

Sony Fridge

8

Fridge

25 inches Long

Whirpool

9

Fridge

18 inches Short

Samsung

10

Washing Machine

32 inches Long

LG

11

Washing Machine

40 inches Long

Samsung

12

Washing Machine

23 Inches Short

Sony

13

Mobile

3 Gb Ram 32 Storage

Redmi

14

Mobile

2 GB Ram 16 Storage

Moto

15

Mobile

4 Gb Ram 64 Storage

Apple


Yaha Kuch Stock Items List Ko Maine Bataya Hai. I Hope Its Helpful for You.


Shortcut Keys in Tally ERP 9

Aap Agar Accounting ka Kaam Tally ERP 9 Software Par Karte Hai To Aapko Apne Work Ko Proper And Sahi Way Se Aasani Se Karne Ke Liye Shortcut Keys Ka Use Karna Tally Me Aana Chahiye Tabhi Aap Tally Me Entries Ko Aasani Se Post Kar Sakege, Kyuki Shortcut Keys Ka Tally me Kafi Jada Importance Role Hai. Aaj Ki Post me Main Aapko Tally Me Shortcut Keys Ke Bare Me Puri Jankari Duga Aur Sath Hi Sath Aap Is Shortcut Keys Ko PDF Me Download Bhi Kar Sakte Hai Shortcut keys in tally erp 9 Pdf To Aaiye Jante Hai.

Shortcut Keys in Tally ERP 9 :-

Shortcut Keys Ko Tally Me Janane Aur Isko PDF File me Download Karne Ke Liye Aap Niche Diye Link Se Download Kar Sakte Hai.

Sabse Pahle Mai Tally ERP 9 Me Un Shortkeys Ki Baat Karuga Jiske Jariye Aap Tally Me Apne Work Ko Aasani Se Aur Bahut Hi-Speed Ke Sath Kar Paege Toh, Aaiye Janate Hai.

1:-Gateway Of Tally Me Short Keys Ka Use Kaise Kare?

Gateway Of Tally Me Aapko Agar Short Key Ka Use Karke Aasani Se Entry Karni Hai Toh Aap Sabse Pahle Ye Dakhe Ki Jo Bhi Capital Letter Me Word Hoga Wohi Uski Short Key Hogi.

Aur Wo Word Hamesa Highlighted Aapko Dikhai Dega. Aaiye Example Se Batata Hu. gateway of tally shortcut

1:- Accounts Info Shortcut Key___(A) Simply Keyboard Se A Button Press Kare Accounts info Open Ho Jaega.

2:- Payroll Info Shortcut Key___(L) Simply Keyboard Se L Button Press Kare Payroll info Open Ho Jaega.

3:- Inventory Info Shortcut Key___(I) Simply Keyboard Se I Button Press Kare Inventory info Open Ho Jaega.

4:- Accounting Voucher Shortcut Key___(V) Simply Keyboard Se V Button Press Kare Accounting Voucher Open Ho Jaega.

5:- Inventory Voucher Shortcut Key___(T) Simply Keyboard Se T Button Press Kare Accounts info Open Ho Jaega.

6:- Payroll Voucher Shortcut Key___(Y) Simply Keyboard Se Y Button Press Kare Payroll Voucher Open Ho Jaega.

7:- Import Of Data Shortcut Key___(O) Simply Keyboard Se O Button Press Kare Import Of Data Open Ho Jaega.

8:- Banking Shortcut Key___(N) Simply Keyboard Se N Button Press Kare Banking Open Ho Jaega.

9:- Balance Sheet Shortcut Key___(B) Simply Keyboard Se B Button Press Kare Balance Sheet  Open Ho Jaegi.

10:- Profit & Loss A/c Shortcut Key___(P) Simply Keyboard Se P Button Press Kare Profit & Loss A/c Open Ho Jaega.

11:- Stock Summar Shortcut Key___(S) Simply Keyboard Se S Button Press Kare Stock Summary Open Ho Jaegi.

12:- Ratio Analysis Shortcut Key___(R) Simply Keyboard Se R Button Press Kare Ratio Analysis  Open Ho Jaega.

13:- Display Shortcut Key___(D) Simply Keyboard Se D Button Press Kare Display Open Ho Jaega.

14:- Multi-Account Printing Shortcut Key___(M) Simply Keyboard Se M Button Press Kare Multi Account Printing Open Ho Jaega.

Thik Isi Tarah Aap Kisi Bhi Menu Me Suru Ke Capital Word Ko jaise hi Press karege, Wo Open Ho Jaega.

2:-Accounts Info Me Short Keys Ka Use Kaise Kare?

accounts info shortcut

1:- Groups Ke Liye Shortcut Key___(G) Simply Keyboard Se G Button Press Kare Groups Open Ho Jaega.

2:- Ledgers Ke Liye Shortcut Key___(L) Simply Keyboard Se L Button Press Kare Ledgers Open Ho Jaega.

3:- Voucher Types Ke Liye Shortcut Key___(V) Simply Keyboard Se V Button Press Kare Vouchers Type  Open Ho Jaega.

4:- Quit Ke Liye Shortcut Key___(Q) Simply Keyboard Se Q Button Press Kare Quit Ho Jaege Tally Se.

3:-Inventory Info Me Short Keys Ka Use Kaise Kare?

inventory voucher shortcut

1:- Stock Groups Ke Liye Shortcut Key___(G) Simply Keyboard Se G Button Press Kare Stock Groups Open Ho Jaega.

2:- Stock Items Ke Liye Shortcut Key___(I) Simply Keyboard Se I Button Press Kare Stock Items Open Ho Jaega.

3:- Unit Of Measure Ke Liye Shortcut Key___(U) Simply Keyboard Se U Button Press Kare Unit Of Measure Open Ho Jaega.

4:- Vouchers Types Ke Liye Shortcut Key___(V) Simply Keyboard Se V Button Press  Kare Vouchers Types Open Ho Jaega.

5:- Copy Allocation Details Ke Liye Shortcut Key___(A) Simply Keyboard Se A Button Press Kare Copy Allocation Details Open Ho Jaega.

Theek Isi Tarah Se Aap Tally Ke Kisi Bhi Menu Me jakar Uski Short Key Ko Apne Keyboard Se Wo Word Ko Press Karke Aasani Se Use Kar Sakte Hai, Aaiye Ab Another Short Key Ka Use Karna Aapko Bataye.

Tally Short Keys in Following:-

## Tally Me Company Se Related Short Keys:-

1:- Alt+F1___Company Shut Means Company Ko Close Karne Ke Liye Use Karte Hai.

2:- Alt+F3___Company Info Means Company  Info Par Jane Ke Liye Use Karte Hai.

3:- F2___Date Means Company Ki Date Ko Change Karne Ke Liye Use Karte Hai.

4:- Alt+F2___Change Period Means Company Ke Period Financial Year Wagara ko Change Karne Ke Liye Use Karte Hai.

Company Short Keys

company info

## Tally Me Accounting Vouchers Se Related Short Keys:-

1:- F4___Contra Voucher Open Karne Ke Liye Use Karte Hai.

2:- F5___Payment Voucher Open Karne Ke Liye Use Karte Hai

3:- F6___Receipt Voucher Open Karne Ke Liye Use Karte Hai

4:- F7___ Journal Voucher Open Karne Ke Liye Use Karte Hai

5:- F8___Sale Voucher Open Karne Ke Liye Use Karte Hai

6:- F9___Purchase Voucher Open Karne Ke Liye Use Karte Hai

7:- F10___Reversing Journal Voucher Open Karne Ke Liye Use Karte Hai

8:- F11___Features Options Open Karne Ke Liye Use Karte Hai

9:- F12___Configuration Setting Open Karne Ke Liye Use Karte Hai

10:- Alt+F1___Voucher Menu Me Rahne Par Agar Aap Alt+F1 Press Karege Toh Inventory Voucher Par Stock Journal Voucher Open Ho jaega.

11:- Ctrl+F2___Sale Order Voucher Open Karne Ke Liye Use Karte Hai

11:- Ctrl+F2___Sale Order Voucher Open Karne Ke Liye Use Karte Hai

12:- Ctrl+F1___Payroll Voucher Open Karne Ke Liye Use Karte Hai

13:- Ctrl+F8___Credit Note Voucher Open Karne Ke Liye Use Karte Hai

14:- Ctrl+F9___Debit Note Voucher Open Karne Ke Liye Use Karte Hai

15:- Ctrl+F10___Memo Voucher Open Karne Ke Liye Use Karte Hai

16:- I___Alt+I Press Karne Par Accounting Invoice Open Ho jaegi.

17:- V___Ctrl+V Press Karne Par As Voucher Open Hoga.

18:- Ctrl+T___Post Dated Voucher Ke Liye 

19:- Ctrl+L___Optional Voucher Ke Liye 

Accounting Voucher Short Keys

vouchers shortcut keys

## Tally Me Inventory Vouchers Se Related Short Keys:-

1:- Ctrl+F6___Rejection Inward Voucher Open Karne Ke Liye Use Karte Hai

2:- Alt+F6___Rejection Outward Voucher Open Karne Ke Liye Use Karte Hai

3:- Alt+F8___Delivery Note Voucher Open Karne Ke Liye Use Karte Hai

4:- Alt+F9___Receipt Note Voucher Open Karne Ke Liye Use Karte Hai

5:- Alt+F10___Physical Stock Voucher Open Karne Ke Liye Use Karte Hai

6:- Ctrl+J___Material Out Voucher Open Karne Ke Liye Use Karte Hai

7:- Ctrl+W___Material In Voucher Open Karne Ke Liye Use Karte Hai

8:- Alt+S___Stock Query Voucher Open Karne Ke Liye Use Karte Hai

9:- Ctrl+T___Post Dated Voucher Open Karne Ke Liye Use Karte Hai

10:- Ctrl+L___Optional Voucher Open Karne Ke Liye Use Karte Hai

Inventory Voucher Short Keys inventory voucher shortkeys


## Tally Me Balance Sheet Se Related Short Keys:-

1:- Alt+F1___Detailed View Ke Liye Use Karte Hai. 

2:- F7___Valuation Ke Liye Use Karte Hai. 

3:- Alt+S___Sechudle Ke Liye Use Karte Hai. 

4:- Alt+C___New Column Add Karne Ke Liye Use Karte Hai. 

5:- Alt+A___Alter Coulum Karne Ke Liye Use Karte Hai. 

6:- Alt+D___ Column Delete Karne Ke Liye Use Karte Hai.

7:- Alt+N___Auto Column Ke Liye Use Karte Hai.

8:- F9___Inventory Report Ke Liye Use Karte Hai.  

9:- F10___Account Report Ke Liye Use Karte Hai. 

10:- Alt+F12___Range Ke Liye Use Karte Hai. 

 11:- Ctrl+F12___Value Ke Liye Use Karte Hai. 

Balance Sheet Short Keys balance sheet shortkeys


## Tally Me Invoice Print Se Related Short Keys:-

1:- Alt+P___Invoice Print Karne Ke Liye Use Karte Hai.

2:- Alt+L___Print Language Set Karne Ke Liye Use Karte Hai.

3:- Alt+I___ Print Preview Dakhne Ke Liye Use Karte Hai.

4:- Alt+T___Invoice Print Titling Karne Ke Liye Use Karte Hai.

5:- Ctrl+G___Invoice Print Page Nos Check Karne Ke Liye Use Karte Hai.

6:- Alt+R___Invoice Pre Prianted Use Karne Ke Liye Use Karte Hai.

7:- Alt+F___Invoice Print Format Set Karne Ke Liye Use Karte Hai.

8:- Alt+C___Invoice Print Copies Use Karne Ke Liye Use Karte Hai.

9:- Alt+S___Select Printer Ke Liye Use Karte Hai.

10:- Alt+E___Data Export Karne Ke Liye Use Karte Hai.

11:- Alt+M___Mail Karne Ke Liye Use Karte Hai.

12:- Alt+O___Upload Karne Ke Liye Use Karte Hai.

13:- Alt+G___Language Set Karne Ke Liye Use Karte Hai.

14:- Alt+K___Keyboard Use Karne Ke Liye Use Karte Hai.

15:- Alt+H___Help Ke Liye Use Karte Hai.

16:- Alt+Z___Invoice Zoom Karke Dakhne Ke Liye Use Karte Hai.

Print Setting Short Keys

print setting shortcuts

Others Short Keys:-

1:- Ctrl+Alt+C___Tally Me Data Ko Copy Karne Ke Liye Use Karte Hai.

2:- Ctrl+Alt+X___Tally Me Data Ko Cut Karne Ke Liye Use Karte Hai.

3:- Ctrl+Alt+P___Tally Me Data Ko Paste Karne Ke Liye Use Karte Hai.

4:- Alt+A___Tally Me Data Entry Post Karte Time New Voucher ko Add Karne Ke Liye Use Karte Hai.

5:- Alt+S___Tally Me Tax Liability Ko Kam Karna Chahate Hai, Alt+S Press Karne Par Statutory Adjustment Open Ho jaega Usi Ke Liye Use Karte Hai.

6:- Ctrl+Enter___Tally Me Data Entry Karte Time Ledger Dakhna Ya Alter Karne Ke Liye Use Karte Hai.

7:- Ctrl+N___Calculator Open Karne Ke Liye Use Karte Hai.

8:- Alt+X___Entry Ko Cancel Karne Ke Liye Use Karte Hai.

9:- Ctrl+R___Koi Narration Aapne Type ki hui Hai Usko Again Likhne Ke Liye Ctrl+R Press karege Narration Again Call Hokar Aa jaegi Usi Ke Liye Use Karte Hai.

10:- Alt+2___Duplicate Voucher Create Karne Ke Liye Use Karte Hai.