Accounting Voucher


Accounting Voucher


What is Vouchers

Every business ought to have transactions where their ultimate profit and loss bring up. So, managing the transactions smarter gives a boost to the organizations. As many organizations moved toward , the voucher is the primary online document used to record the transactions.
Example:a purchase invoice, a sales receipt, a petty cash docket, a bank interest statement.

Types of Accounting Vouchers:

  • Payment Voucher
  • Receipt Voucher
  • Contra Voucher
  • Journal Voucher
  • Sales Voucher
  • Purchase Voucher
  • Credit Note Voucher
  • Debit Note Voucher

Double entry system

Example: giving the benefit and the other receiving the benefit.

  • A transaction has two-fold aspects.
  • One account needs to be debited and the other is to be credited.
  • Every debit must have its corresponding and equal credit.

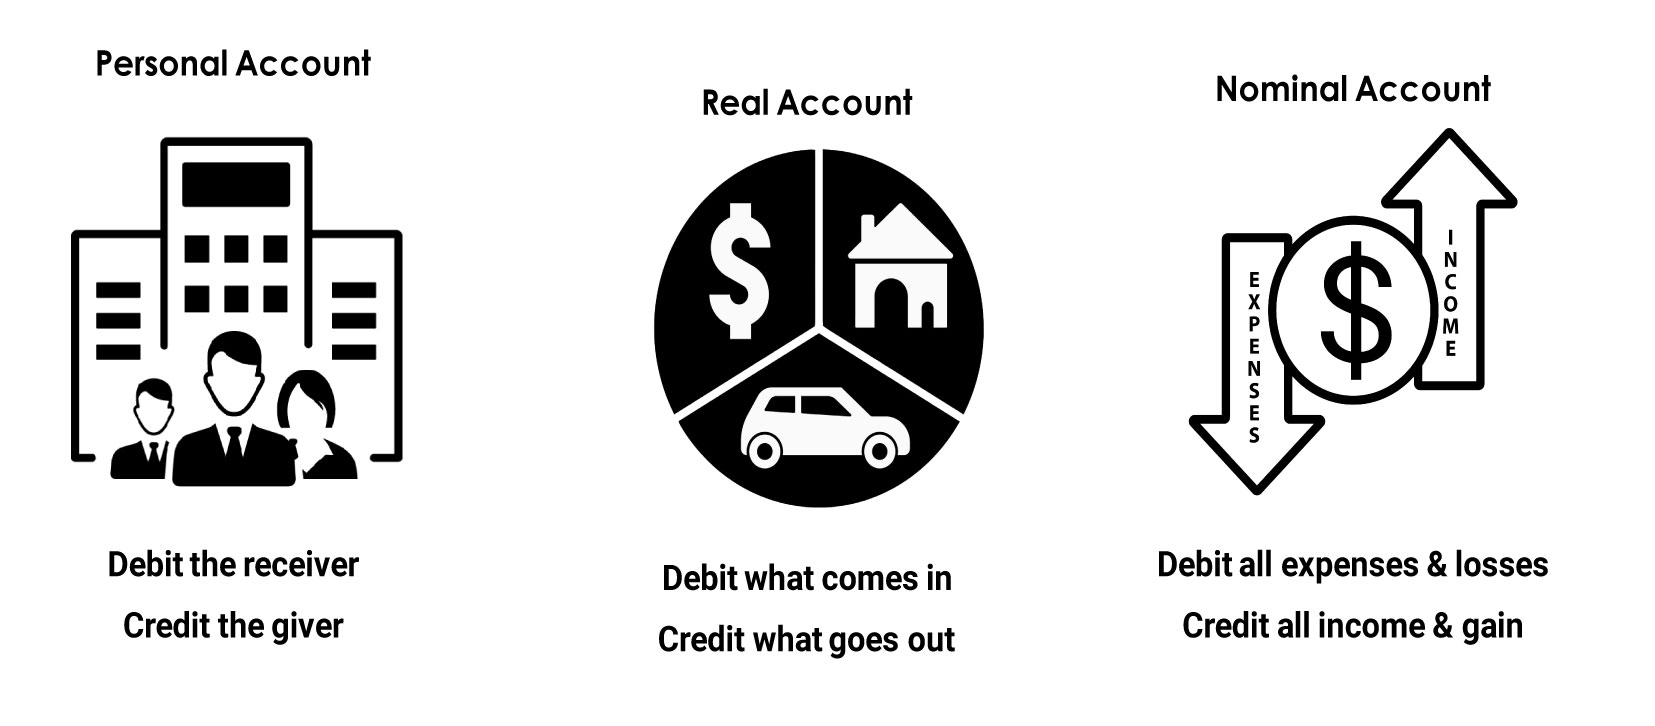
Golden Rules

gold and rule

Basic Accounting Equation

Assets = Liabilities + Owners Equity(capital).

Credit & Debit rules

credit debit

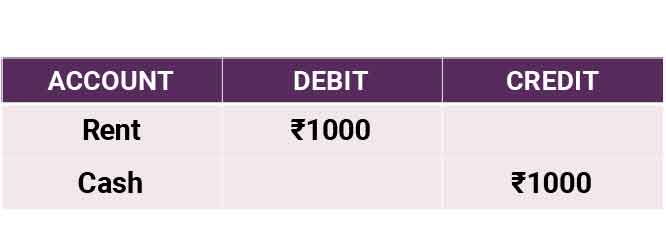
Example You paid rent (₹1000).

rent paid

Example for accounting equation


Example sum

Particulars₹ Rupees
Started business with cash₹ 1,00,000
Borrowed loan from bank₹ 25,000
Deposited cash into bank₹ 60,000
Bought goods and paid by cheque₹ 10,000
Cash withdrawn for personal use₹ 5,000
Cash withdrawn from bank for office use₹ 3,000

Solution

S.noAssetsLiabilitiesCapital
StockCashBank
1+ 1,00,000+ 1,00,000
2– 60,000+ 60,000
3+ 25,000+ 25,000
4+ 10,000– 10,000
5– 5,000– 5,000
6+ 3,000– 3,000
+ 10,000+ 38,000+ 72,000+ 25,000+ 95,000
₹ 1,20,000₹ 1,20,000

टैली क्रिएट ग्रुप

टैली क्रिएट ग्रुप

इस खंड में, हम सीखेंगे कि टैली में एक समूह कैसे बनाया जाता है। हम यह भी देखेंगे कि बनाए गए समूहों को कैसे बदला और प्रदर्शित किया जाए।

यदि हम पहली बार टैली में समूह बना रहे हैं, तो निम्नलिखित चीजों को सक्षम करने की अनुशंसा की जाती है:

  • मास्टर में उन्नत प्रविष्टियों की अनुमति दें
  • मास्टर्स में उन्नत जानकारी प्रदान करें

टैली में समूह बनाने के लिए निम्न पथ का प्रयोग करें

गेटवे ऑफ़ टैली → F12: कॉन्फिगर करें → अकाउंट्स / इन्वेंटरी जानकारी → अकाउंट्स

टैली में ग्रुप कैसे बनाएं

टैली ईआरपी 9 में, निम्नलिखित  विविध देनदार खाताधारकों को बनाए रखें:

मुख्य समूह:  उत्तर भारत देनदार समूह और विविध देनदारों के तहत दक्षिण भारत देनदार समूह

उप-समूह:  टेक समाधान समूहीकृत और एबीसी सीमित उत्तर भारत देनदारों के तहत। हैदराबाद देनदार, बैंगलोर देनदार, दक्षिण भारत देनदारों के तहत विजयवाड़ा देनदार।

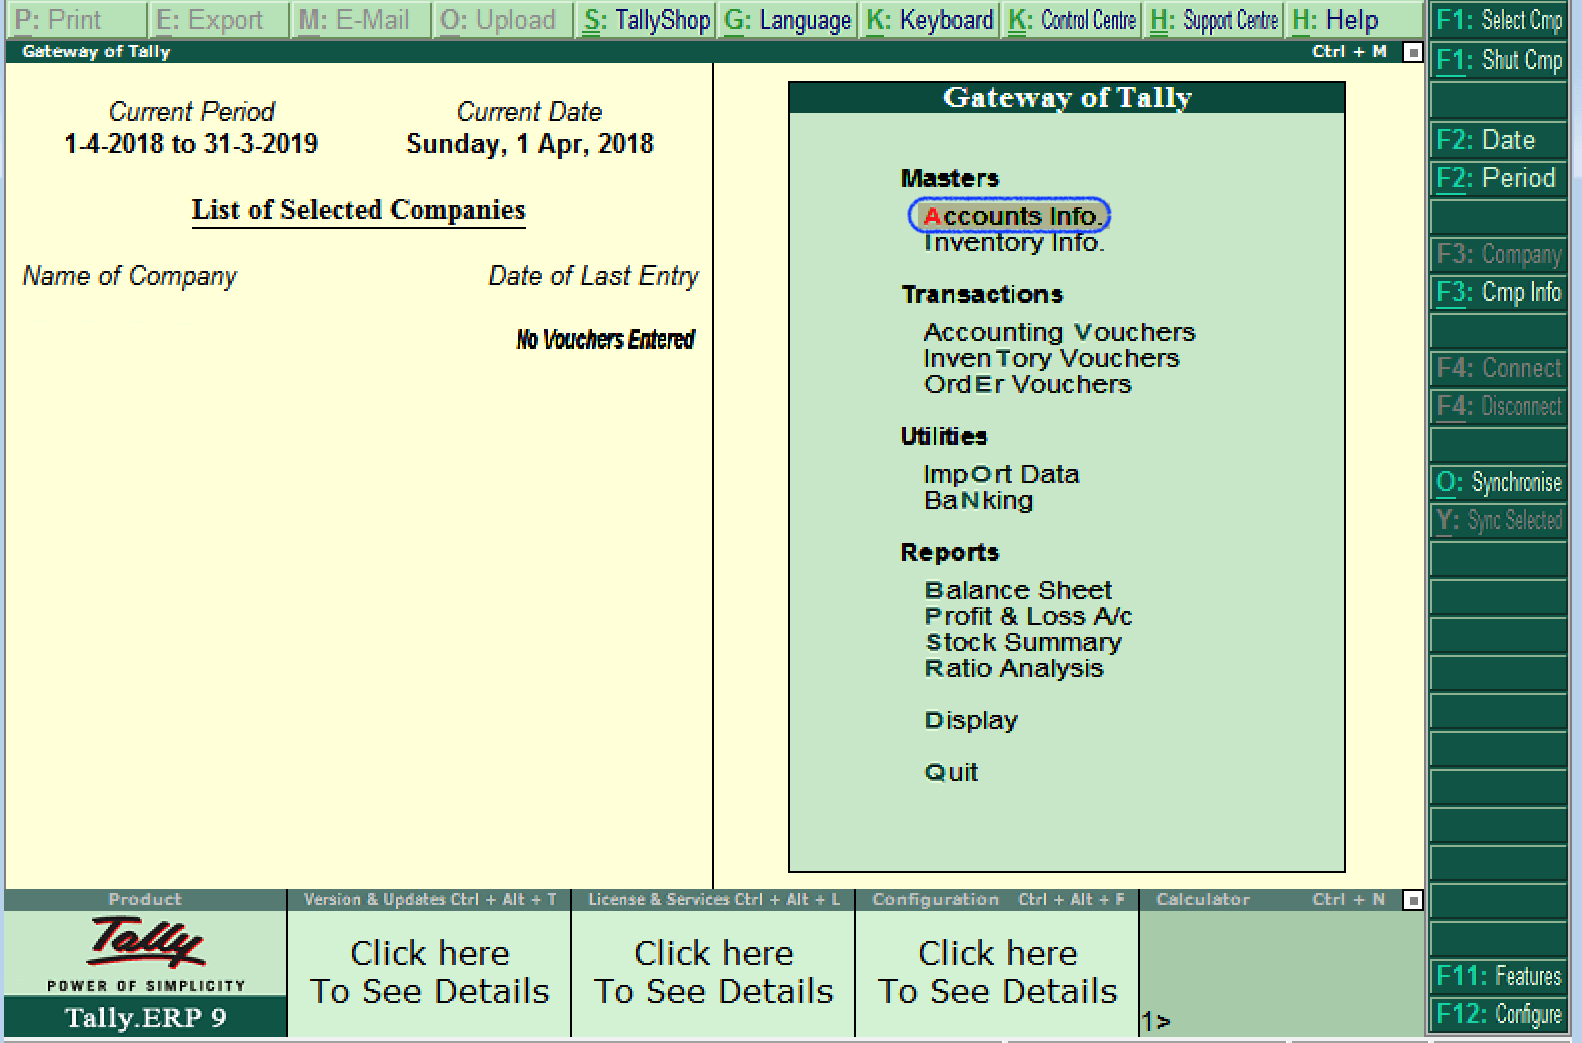
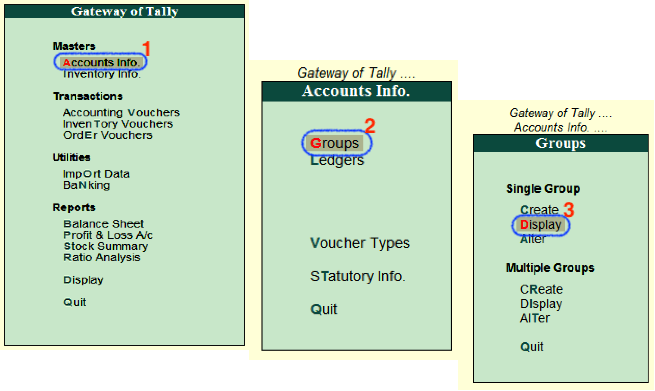
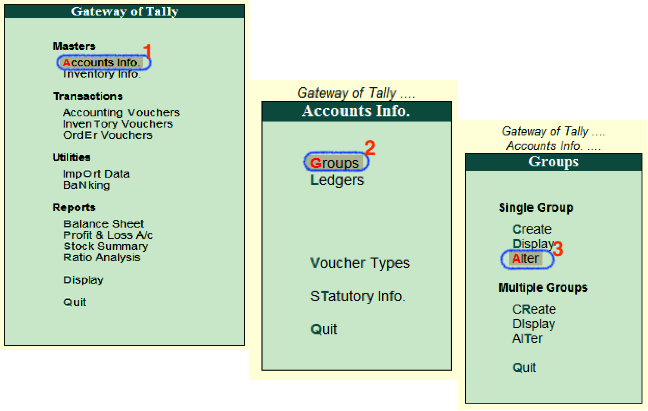
स्टेप 1:  इस स्टेप में  गेटवे ऑफ टैली में जाएं  और फिर  अकाउंट्स इंफो पर क्लिक करें ।

टैली ईआरपी 9 में ग्रुप कैसे बनाएं

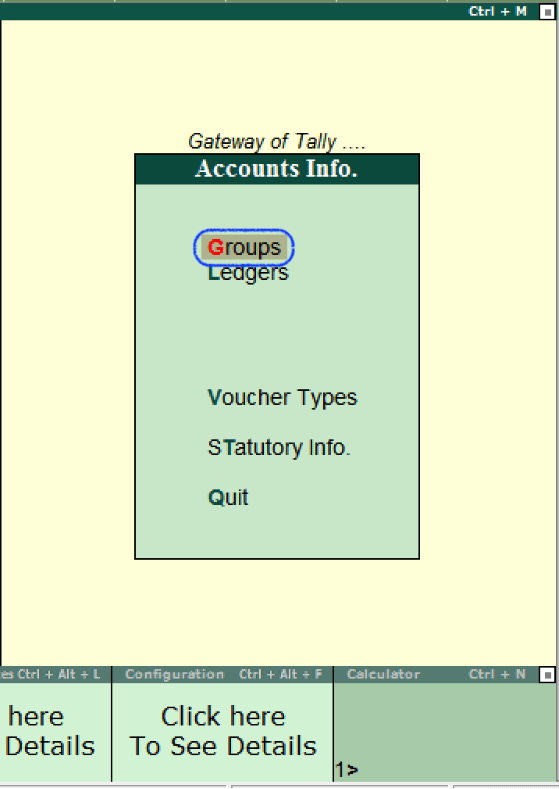
चरण 2: लेखा जानकारी  के अंतर्गत   विकल्प  समूह चुनें ।

टैली ईआरपी 9 में ग्रुप कैसे बनाएं

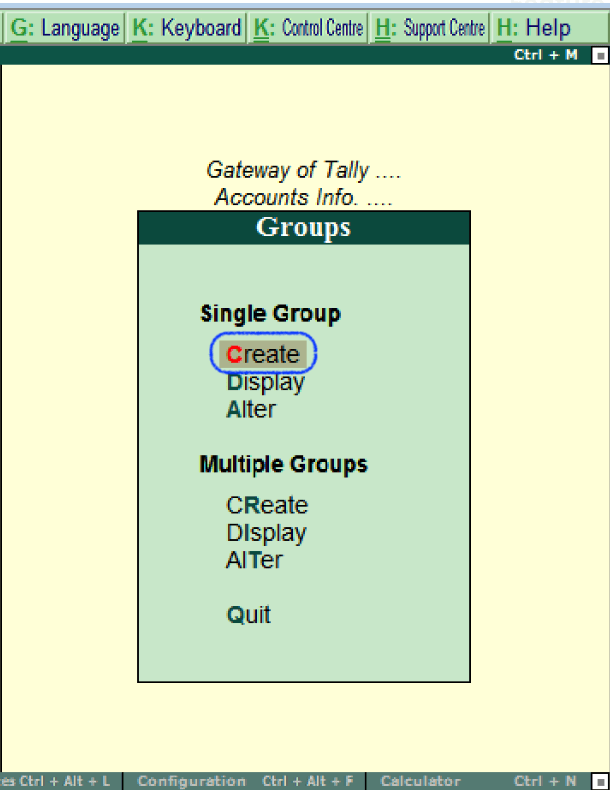
चरण 3:  टैली ईआरपी 9 में,  सिंगल ग्रुप बनाने के लिए सिंगल ग्रुप  मेन्यू के  तहत  क्रिएट का विकल्प चुनें।

टैली ईआरपी 9 में ग्रुप कैसे बनाएं

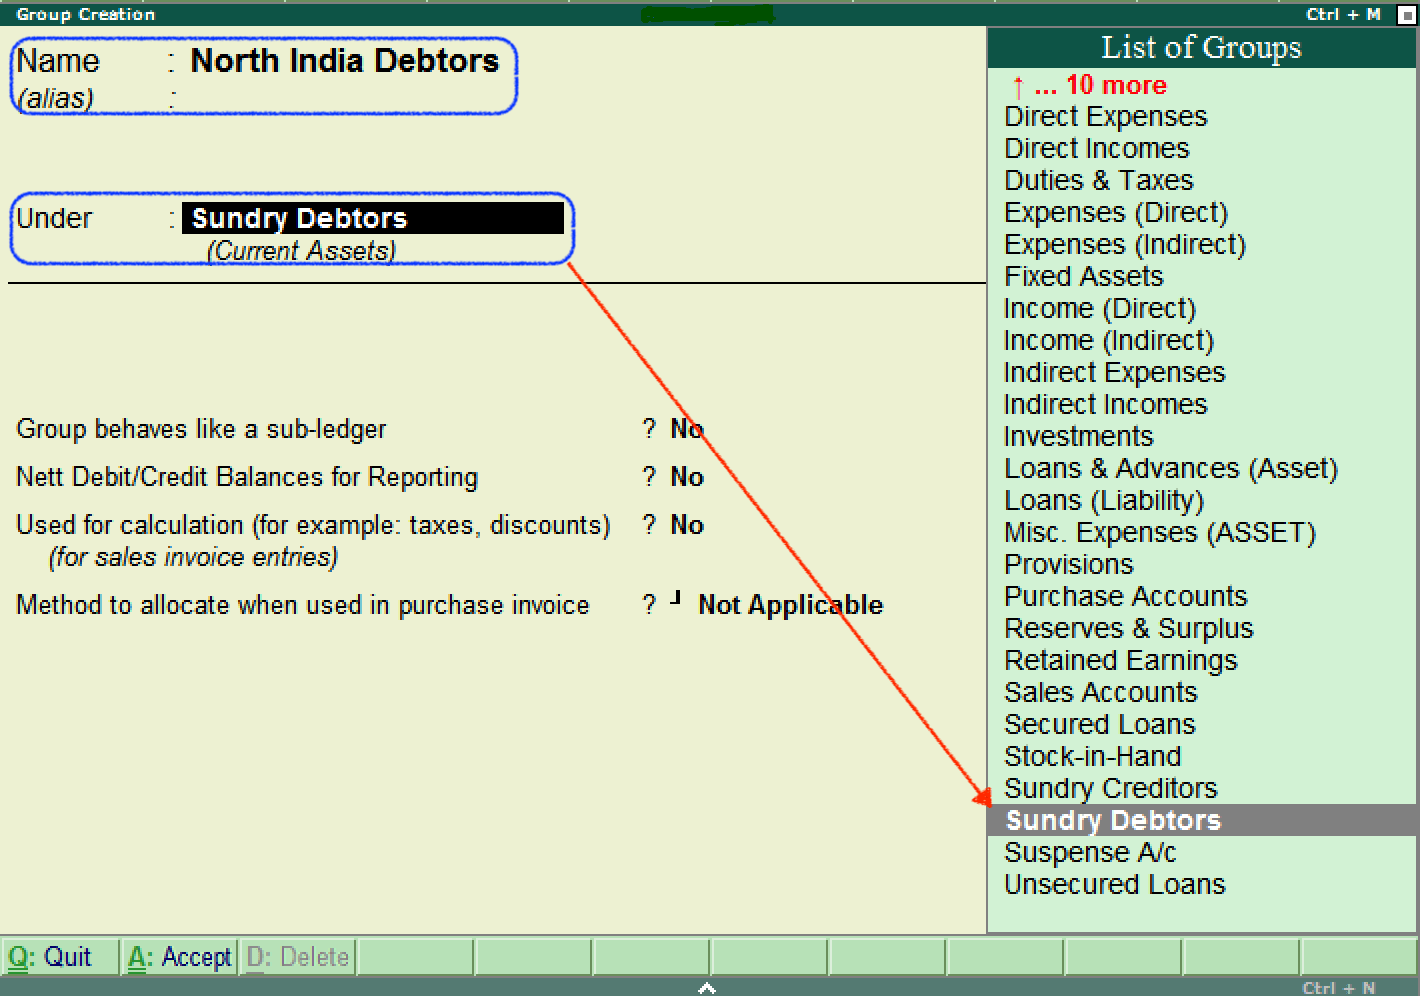
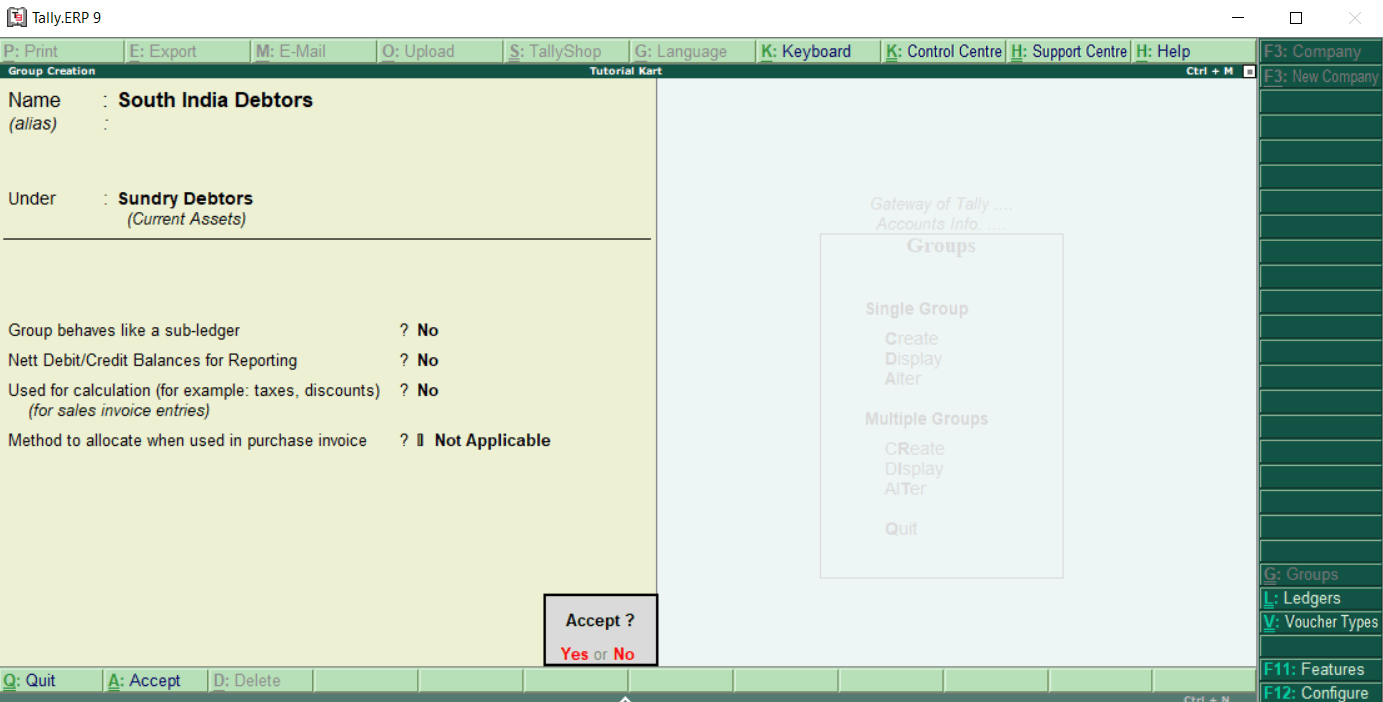
चरण 4:  समूह निर्माण स्क्रीन पर निम्नलिखित विवरण अपडेट करें:

नाम:  समूह का नाम निर्दिष्ट करें और फिर जारी रखने के लिए एंटर दबाएं।

के अंतर्गत:  समूहों की सूची के अंतर्गत, विविध देनदारों के रूप में समूह का नाम चुनें।

टैली ईआरपी 9 में ग्रुप कैसे बनाएं

आवश्यक विवरण दर्ज करने के बाद,  Ctrl + A दबाएं:  विवरण को सहेजने के लिए स्वीकार करें  या एंटर दबाएं  

साथ ही, उपरोक्त प्रक्रिया का उपयोग करके अन्य समूह बनाएं

  • विविध देनदारों के अधीन दक्षिण भारत के देनदार
  • दक्षिण भारत देनदारों के अधीन हैदराबाद देनदार, बंगलौर देनदार, और विजयवाड़ा देनदार।
  • टेक सॉल्यूशंस या एबीसी बैंगलोर देनदारों के तहत सीमित है।
टैली ईआरपी 9 में ग्रुप कैसे बनाएं

टैली का उपयोग सभी डिफ़ॉल्ट समूहों के अंतर्गत कितने भी समूह बनाने के लिए किया जाता है। यहां हमने विविध यानी उत्तर भारत देनदार और दक्षिण भारत देनदार के तहत दो समूह बनाए हैं। दक्षिण भारत के देनदारों के तहत, तीन उप-समूह ( हैदराबाद देनदार, बैंगलोर देनदार, विजयवाड़ा देनदार ) बनाए गए।

टैली में समूह कैसे प्रदर्शित करें

टैली ईआरपी 9 में ग्रुप बनाने के बाद हम सभी बनाए गए ग्रुप्स को विस्तार से प्रदर्शित कर सकते हैं। हालांकि, उपयोगकर्ताओं को प्रदर्शन मोड में डेटा को संपादित/बदलने की अनुमति नहीं है।

चरण 1:  टैली में समूहों को प्रदर्शित करने के लिए निम्न पथ का उपयोग करें

टैली का प्रवेश द्वार → खातों की जानकारी → समूह

स्टेप 2:  सिंगल ग्रुप के तहत, टैली में ग्रुप्स को प्रदर्शित करने के लिए डिस्प्ले के विकल्प पर क्लिक करें।

टैली ईआरपी 9 में ग्रुप कैसे बनाएं

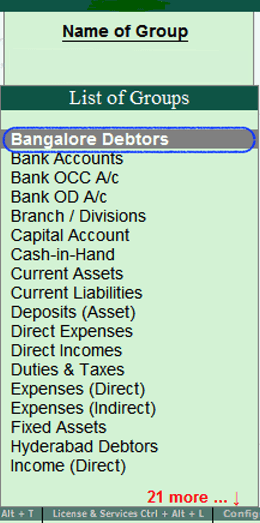
चरण 3: समूह के नाम की सूची के  तहत आवश्यक समूह का नाम चुनें   और फिर स्क्रीन पर प्रदर्शित करने के लिए उस विशेष समूह पर क्लिक करें:

टैली ईआरपी 9 में ग्रुप कैसे बनाएं

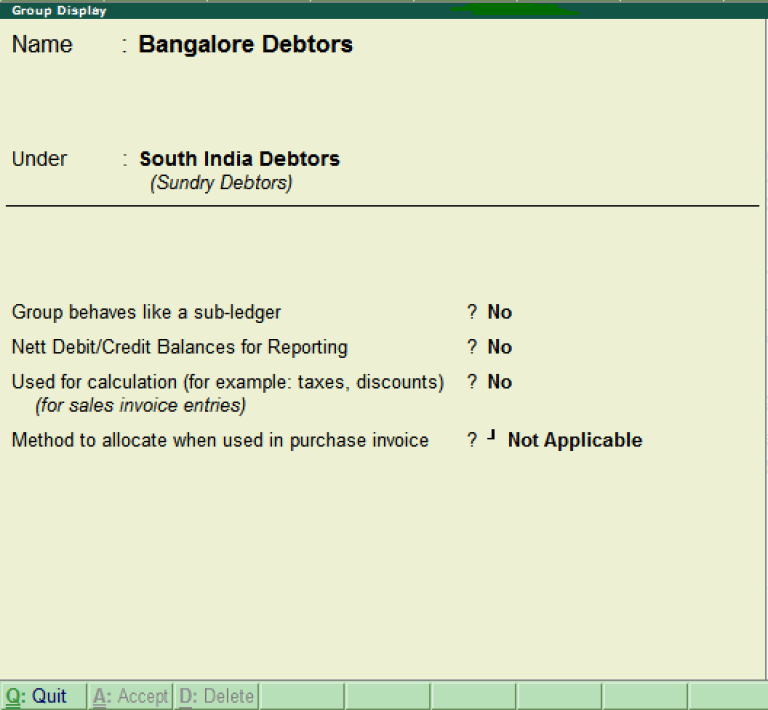
चरण 4:  अब खाता बही (बैंगलोर देनदार) स्क्रीन पर इस प्रकार प्रदर्शित होती है:

टैली ईआरपी 9 में ग्रुप कैसे बनाएं

चरण 5:  स्क्रीन को बंद करने के लिए  Q: Quit पर क्लिक करें ।

टैली ईआरपी 9 में ग्रुप को कैसे बदलें

टैली ईआरपी 9 एप्लिकेशन में, ग्रुप बनाने के बाद, हम आवश्यकताओं के अनुसार विवरण बदल सकते हैं। टैली में समूह को संशोधित/बदलने के लिए निम्नलिखित चरणों का संदर्भ लें:

चरण 1:  टैली में समूहों को बदलने के लिए निम्न पथ का उपयोग करें

टैली का प्रवेश द्वार → खातों की जानकारी → समूह

चरण 2: सिंगल ग्रुप के तहत ऑल्टर  विकल्प   पर क्लिक करें  ।

टैली ईआरपी 9 में ग्रुप कैसे बनाएं

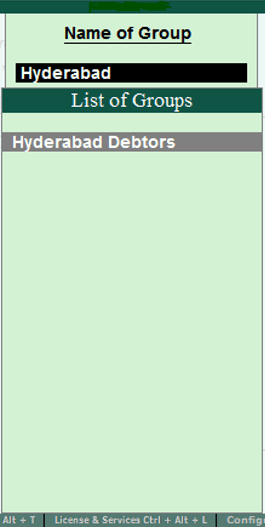
चरण 3:  दिए गए खोज क्षेत्र से, हम समूह को खोज सकते हैं और फिर विवरण को संशोधित करने के लिए उस समूह के नाम पर क्लिक कर सकते हैं।

टैली ईआरपी 9 में ग्रुप कैसे बनाएं

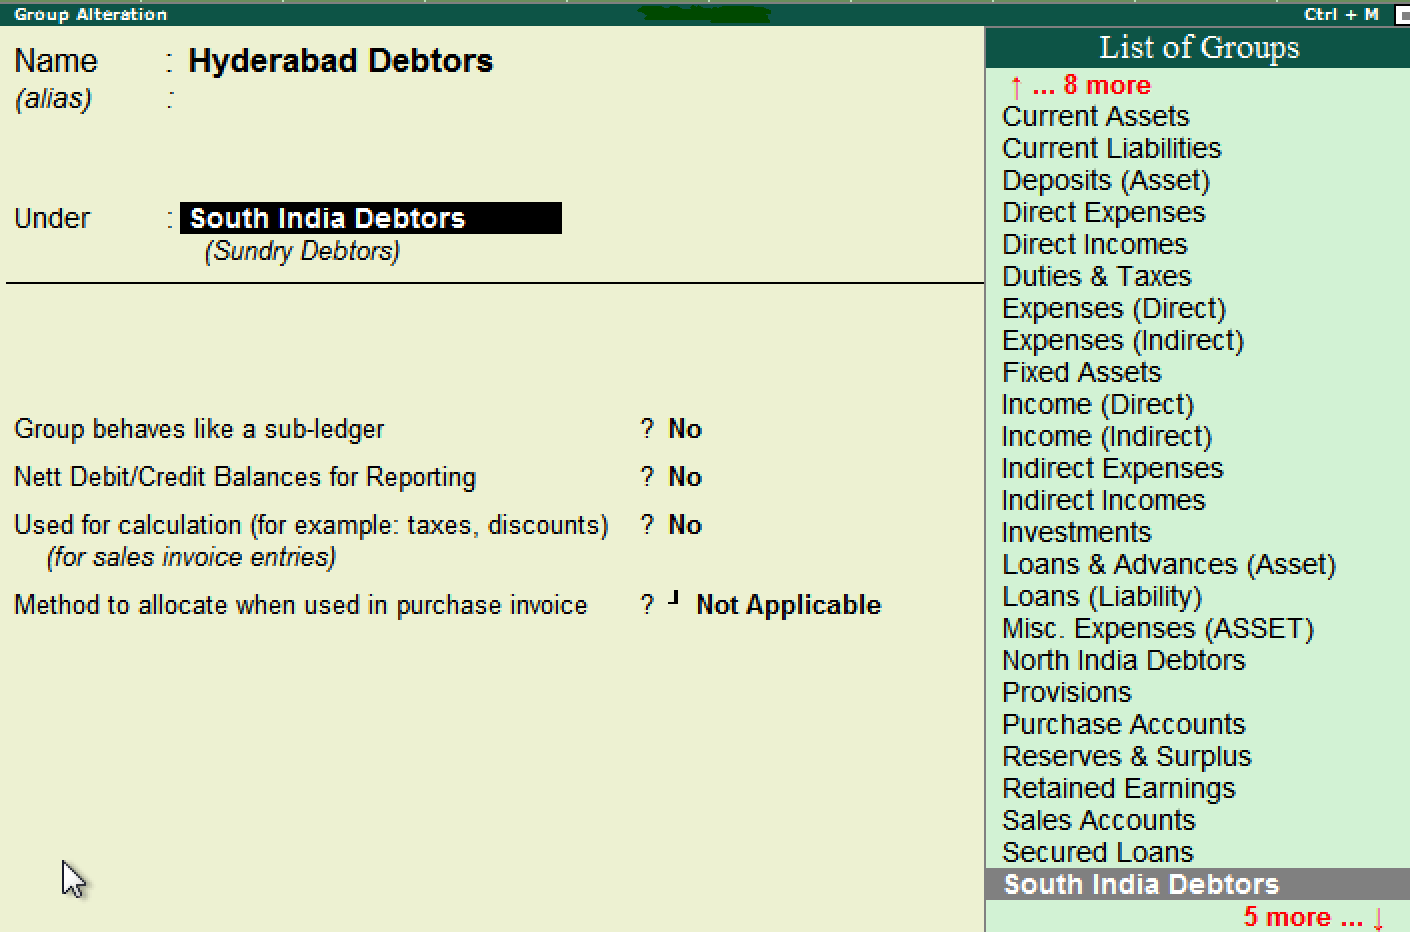
चरण 4:  समूह परिवर्तन स्क्रीन पर आवश्यक विवरण अपडेट करें और फिर   विवरण को सहेजने के लिए ए: स्वीकार करें पर क्लिक करें।

टैली ईआरपी 9 में ग्रुप कैसे बनाएं

Tally Me Bill Ki Entry Kaise Kare

Agar Aap Bhi Apne Business Ko Run Karte hai Aur Tally Me Bill Ki Entry Karna Chahate Hai To Aaj Ki Ye Post Aapke Liye Kafi Important Hai. Aksar Tally Me Sale Aur Purchase Bill Ki Entry Karne Me Hamko Bahut Problem Aati Hai Toh Aaj Ki Is Post Me Mai Aapko Ye Batauga Ki Computer Me Kis Tarah Se Bill Banaye Aur Bill Ki Entry Kaise Kare.Aaj Ke Is Article Me Hum Janege Ki Tally me entry kaise kare?


Tally Me Bill Ki Entry Karne Ke 2 Types Hai.

  • Purchase Bill Ki Entry Karna

  • Sale Bill Ki Entry Karna.

Tally Me Purchase Bill Ki Entry Kaise Kare?

Tally Me Purchase Bill Ki Entry Karne Ke Liye Aapke Paas Kisi Party Ya Company Ka Purchase Means Aapne Us Party Se Jo Bhi Item Purchase Ki Hui Hai, Uska Bill Hona Required Hai Tabhi Aap Us Bill Ki Entry Tally Me Kar Payege…

Example Ke Liye Mai Yaha Ek Company Raj Enterprise Se Kuch Items Purchase Ki Hui Hai, Jiska Bill Kuch Is Tarah Hai. Aaiye Janate Hai Ki Tally Me Purchase Bill Ki Entry Kaise Kare?..

Purchase Bill Of Raj Enterprise

purchase bill

Tally Me Purchase Bill Ki Entry Karne Ke Liye Aapko Kuch Steps Ko Follow Karne Padege.

STEP:1- Sabse Pahle Tally ERP 9 Software Ko Open Kare.

STEP:2- Ab Tally Me Accounting Voucher Me Jaye Aur Simply Purchase Voucher Ko Open Kare. Purchase Voucher Ko Open Karne Ke Liye Keyboard Se F9 Key Press Kare.

STEP:3 Aapke Samane Purchase Voucher Open Ho Jaega, Ab Purchase Voucher Me Raj Enterprise Ke Bill Ki Sabhi Details Ko Kuch Is Tarah Se Enter Kare…

Purchse Bill Ki Entry Kuch Is Tarah Se Kare.

purchase voucher

  • Purchase No 1:- Yaha Purchase Number Automatic Show Hoga.

  • Date:- Aapne Jis Bhi Date Me Goods Ko Purchase Kiya Tha Wohi Date Ko Enter Kare.

  • Supplier Invoice Number:- Purchase Bill Me Aapko Supplier Ka Bill No Show Ho Raha Hoga, Us Bill No Ko Yaha Enter Kare.

  • Party A/c Name:- Yaha Aapne Jis Party/Company Se Goods Ko Purchase Kiya Hai, Us Party/Company Ka Ledger Create Kare.

Agar Aap Ledger Create Karna Nahi Janate Toh Is Article Ko Carefully Read Kare. 

  • Purchase Ledger:- Yaha Aap Purchase Account Ke Naam Se Ek Ledger Create Kare.

  • Name Of Item:- Yaha Aapko Us Item Ko Create Karna Padega Jisko Aapne Purchase Kiya Hua Hai, Humne Raj Enterprise Se Keyboard Purchase Ki Hui Hai Toh Hum Keyboard Naam Ki Item Ko Create Karege.

Agar Aapko Stock Items Create Karne Me Koi Problem Hai Toh Aap Is Article Ko Padh Kar Tally Me Stock Item Ko Aasani Se Create Kar Sakte Hai. 

Tax Ledger:- Ab Aapko GST Tax Calculation Ke Liye Tax Ke Ledgers Ko Create Karna Hoga, Jaisa Hum Janate Hai Ki Hum Local Goods Ko Purchase Kar Rahe Hai Toh CGST, SGST Ledgers Create karne Padege.

Jaise Hi Aap Tax Ledgers Create Karke Apply Karege, Then Instant Aapke Item Par Automatically Tax Calculate Ho Jaega.

  • Narration:- Aap Narration Me Apni Marji Ke According Entry Ko Yaad Rakhne Ke Liye Kuch Bhi Likh Sakte Hai.

Finally Sabhi Details Ko Fillup Karne Ke Baad Yes karke Entry ko Save kar Le, Is Tarah Se Aap Purchase Voucher Me Bill Ki Entry Aasani Se kar Sakte Hai.

Tally Me Sale Bill Ki Entry Kaise Kare?

Tally Me Sale Bill Ki Entry Karne Ke Liye Aapko Apne Customer Ki Details Jaise Uska Naam, GSTIN Number, Address Etc Jankari Hona Required Hai.

So Aaiye Ek Example Se Aapko Explain Karta Hu Suppose Meri Company Ka Naam DK Enterprise Hai Aur Mai Ek Party/Customer Nitesh Kumar Ko Kuch Items Sale Karna Chahata Hu Toh Aisi Condition Me Hum Kis Tarah Tally Me Sale Bill Ki Entry Kare Aaiye Woh Janate Hai

Sale Bill Of Nitesh Kumar.

sale bill

Tally Me Sale Bill Ki Entry Karne Ke Liye Aapko Kuch Steps Ko Follow Karne Padege.

STEP:1- Sabse Pahle Tally ERP 9 Software Ko Open Kare.

STEP:2- Ab Tally Me Accounting Voucher Me Jaye Aur Simply Sale Voucher Ko Open Kare. Sale Voucher Ko Open Karne Ke Liye Keyboard Se F8 Key Press Kare.

STEP:3 Aapke Samane Sale Voucher Open Ho Jaega, Ab Sale Voucher Me Party/Customers Ki Sabhi Details Ko Kuch Is Tarah Se Enter Kare…

Sale Bill Ki Entry Kuch Is Tarah Se Kare.

sale voucher

  • Sale No 1:- Yaha Sale Number Automatic Show Hoga Jaise 2 Aap Item Ko Sale Karege.

  • Date:- Aapne Jis Bhi Date Me Goods Ko Sale Kar Rahe Hai Usi Date Ko Enter Kare.

  • Reference Number:- Sale Bill Create Karte Time Aap Apni Marji Ke According Bill Ka Ek Unique Number Ko Generate Kar Sakte Hai, Aisa Hum Isliye Bhi Karte Hai Ki Hame Ye Pata Rahe Ye Bill Hamari Company Ka Hai.

  • Party A/c Name:- Yaha Aap Jis Party/Customers ko Goods Ko Sale Out Kar Rahe Hai, Us Party/Customers Ka Ledger Create Kare.

Agar Aap Ledger Create Karna Nahi Janate Toh Is Article Ko Carefully Read Kare. 

  • Sale Ledger:- Yaha Aapko Sale Account Ke Naam Se Ek Ledger Create Karna Hoga.

  • Name Of Item:- Yaha Aapko Us Item Ko Create Karna Padega Jisko Aap Sale Karna Chahate Hai. Yaha Humne Kai Items Ko Apne Customer Nitesh Kumar Ko Sale Kiya Hai Toh Hum Ek-2 Karke Un Sabhi Items Ko Create Karege.

Agar Aapko Stock Items Create Karne Me Koi Problem Hai Toh Aap Is Article Ko Padh Kar Tally Me Stock Item Ko Aasani Se Create Kar Sakte Hai. T

Tax Ledger:- Ab Aapko GST Tax Calculation Ke Liye Tax Ke Ledgers Ko Create Karna Hoga, Jaisa Hum Janate Hai Ki Hum Local Goods Ko Sale Kar Rahe Hai Toh CGST, SGST Ledgers Create karne Padege.

Jaise Hi Aap Tax Ledgers Create Karke Apply Karege, Then Instant Aapke Item Par Automatically Tax Calculate Ho Jaega.

  • Narration:- Aap Narration Me Apni Marji Ke According Entry Ko Yaad Rakhne Ke Liye Kuch Bhi Likh Sakte Hai.

Finally Sabhi Details Ko Fillup Karne Ke Baad Yes karke Entry ko Save kar Le, Is Tarah Se Aap Sale Voucher Me Bill Ki Entry Aasani Se kar Sakte Hai.


Voucher Entry in Tally

Voucher Entry

हम वाउचर एंट्री के माध्यम से किसी ट्रांजेक्शन को रिकॉर्ड करते हैं। टैली में अकाउंट्स वाउचर प्रविष्ट करने के लिए टैली के मेन मैन्यू पर Accounting Vouchers को सिलेक्ट करें।


Gateway of Tally →Transactions → Accounting Vouchers

वाउचर एंट्री स्क्रीन में बटन बार पर हमें प्रत्येक वाउचर टाइप के दिए एक बटन प्राप्त होगा। वाउचर एंट्री स्कीन का संबंधित टाइप प्राप्त करने के लिए उपयुक्त बटन को क्लिक करे या उससे संबंधित Function Key दबाएँ।

Voucher Entry Format :
वाउचर्स को इन फॉर्मेट्स में रिकॉर्ड किया जा सकता है |
Normal Format (डेबिट और क्रेडिट कॉलम्स के साथ)
Single Format (बिना डेबिट और क्रेडिट कॉलम्स के)

डबल मोड (नार्मल फॉर्मेट) में एंट्री करना वाउचर को रिकॉर्ड किए जाने का सर्वाधिक लोकप्रिय और उपयोगी तरीका है।नार्मल फॉर्मेट सेट करने के लिए F12:configure पर क्लिक करे और Voucher Ledger Accounts विकल्प को सिलेक्ट करे। जब हम यह विकल्प सिलेक्ट करे तो Accounting Voucher Configure स्कीन प्रकट हो जाएगी। इस स्क्रीन में use single mode for payment/Rcpt/contra विकल्प को no पर और Use Cr/Dr instead of to/by during entry विकल्प को yes पर सेट कर दें।

Components of Voucher screen

वाउचर एंट्री स्कीन को 3 भागो में विभाजित किया जा सकता है|

  • Voucher Header
  • Voucher ledger accounts
  • Voucher Narration


Image result for voucher entry screen in tally
1. Voucher Header: Voucher Header में हम निम्नलिखित विवरण प्रविष्ट कर सकते है |

a. Voucher Number: प्रत्येक वाउचर टाइप के लिए टैली द्वारा वाउचर नम्बर को कालानुक्रमिक क्रम में उत्पन्न की गई श्रंखलानुसार प्रदर्शित किया जाता है।
उदाहरणार्थ, यदि हमारे पेमेंट्स वाउचर का नम्बर 5 था तो अगली बार यह 6 होगा परंतु हम किसी वाउचर को डिलीट कर देते है तो उस स्थिति में टैली दिनांक के अनुक्रम में वाउचर नम्बरों को पुनः व्यवस्थित कर देता है।

b. Voucher Date: वाउचर की दिनांक निरूपित करने हेतु इस फील्ड में वर्तमान दिनांक रखी जाती है। परंतु यदि हम वाउचर दिनांक बदलना चाहते है तो हम निम्नलिखित कार्य सम्पन्न कर सकते है

  • Current Date: वर्तमान दिनांक बदलने के लिए F2 बटन दबाएँ और वाउचर डेट प्रविष्ट करे। परिवर्तित की गई दिनांक के आधार पर आगे आने वाले समस्त वाउचर्स के लिए भी परिवर्तन कर दिए जाते हैं।
  • Voucher Date : वाउचर डेट फील्ड पर वापस जाने के लिए Shift+T दबाएँ और वाउचर दिनांक प्रविष्ट करें। यह हमारी वर्तमान दिनांक को नहीं बदलेगा।

2. Voucher ledger accounts: इस क्षेत्र में प्रत्येक लेजर ट्रांजेक्शन और संबंधित डेटा प्रविष्ट किया जाता है।

a. Ledger Account: पर्टिंक्युलर्स फील्ड में दाहिनी ओर दी गयी लेज़र्स की लिस्ट से लेजर अकाउंट को सिलेक्ट करें। पर्टिंक्युलर्स -फील्ड में स्वचालित रूप से लेजर को प्रविष्ट करने के दिए हमें डबल क्लिक करना होता है।

b. Ledger Amount: लेजर अकाउंट का नाम प्रविष्ट करने के बाद इंटर दबाएँ और हम स्कीन के लेजर अमाउंट वाले कॉलम पर पहुंच जाएँगे। डेबिट अथवा क्रेडिट कॉलम में राशि टाइप करे।

3. Voucher Narration: वाउचर नैरेशन फील्ड में हम वाउचर ट्रांजेक्शन को संक्षेप में लिखते  हैँ। उस स्थिति में जबकी हम यह सुनिश्चित करना चाहते हों कि इस ट्रांजेक्शन को क्यों दर्ज किया गया था, इसे लेकर भविष्य में हम भ्रमित न हों, इसलिए हमें उसके साथ नैरेशन लिख लेना चाहिए।


Voucher entry


 We record any transaction through a voucher entry.  To enter the accounts voucher in the tally, select Accounting Vouchers on the main menu of the tally.


 Gateway of Tally → Transactions → Accounting Vouchers


 4


 On the button bar in the voucher entry screen, we will get a button for each voucher type.  To get the corresponding type of voucher entry screen, click the appropriate button or press the corresponding Function key.


 Voucher Entry Format:

 Vouchers can be recorded in these formats.

 Normal Format (with debit and credit columns)

 Single Format (without debit and credit columns)


 Entering in double mode (normal format) is the most popular and useful way of recording vouchers. To set the normal format, click on F12: configure and select the Voucher Ledger Accounts option.  The Accounting Voucher Configure screen will appear when we select this option.  In this screen set the use single mode for payment / Rcpt / contra option to no and Use Cr / Dr instead of to / by during entry option to yes.


 Components of Voucher screen


 The voucher entry screen can be divided into 3 parts.


 Voucher Header


 Voucher ledger accounts


 Voucher narration


 .1.  Voucher Header: In Voucher Header we can enter the following details.


 a.  Voucher Number: The voucher number is displayed by tally for each voucher type according to the series generated in chronological order.

 For example, if the number of our payments voucher was 5 then next time it will be 6 but if we delete a voucher then in that case the tally reorder the voucher numbers in the sequence of dates.


 b.  Voucher Date: The current date is kept in this field to denote the date of the voucher.  But if we want to change the voucher date then we can do the following


 Current Date: To change the current date, press the F2 button and enter the voucher date.  Changes are also made for all subsequent vouchers based on the changed date.


 Voucher Date: To return to the voucher date field, press Shift + T and enter the voucher date.  It will not change our current date.


 2. Voucher ledger accounts: Every laser transaction and related data are entered in this field.


 a.  Ledger Account: Select the ledger account from the list of lasers given on the right hand side in the Pertunicullers field.  We have to double click to automatically enter the laser in the Pertinicullers-field.


 b.  Ledger Amount: After entering the ledger account name, press inter and we will go to the column containing the ledger amount of the screen.  Type the amount in the debit or credit column.


 3. Voucher Narration: In voucher narration field, we write voucher transaction briefly.  In that case, while we want to make sure that this transaction was recorded, we should not get confused about it in future, so we should write narration with it.

Ledgers क्या है ? what is ledger in tally

क्या आप आज भी Manual Accounting करते है या फिर (Tally ERP 9) Software का Use करते है, क्या आप जानते है की Tally Me Ledgers Kya Hai, और हम  Tally Me Ledgers Kaise Banate Hai? और Ledgers को कैसे   Alter मतलब ( Modification) करते है, और इन ledgers को कैसे Display करते है मतलब की आप उस ledger को कैसे देख सकते है। और जो ledgers Create किए है उन Ledgers को हम कैसे Delete कर सकते है.इन सभी के बारे मे आज मैं आपको जानकारी दूगा। 

क्या आप जानते है की tally मे हम इन Ledgers को किस Groups मे रखते है, एक सवाल आपके मन मे जरूर से आता होगा की आखिर इन Ledgers का Use क्या है? आज के इस आर्टिक्ल मे मई आपके सभी सवालो के जवाब देने वाला हु और Ledger Creation से जुड़ी सभी आपको इस आर्टिक्ल मे मिलेगी तो आइये जानते है। 

Ledgers क्या है ? what is ledger in tally

Tally मे  Groups Create करने के बाद हमे Ledgers बनाने पड़ते है. Ledgers Means Account(खाता) होता है , जो की हमे Tally मे खोलना होता है, modern अकाउंटिंग की भाषा मे इसको हम ledger create करना भी कहते  है, मतलब की साफ शब्दो मे कहा जाए तो Account (खाता) खोलने को ही हम ledger बनाना कहते है। 

देखा जाए तो ledger एक तरह का अकाउंट होता है , जिसकी मदद से हम टैली मे Voucher Entry करते है। आपके लिए ये जानना बहुत ही जरूरी है की Tally मे  Entry करने से पहले आपको Ledger Create करना होता है। 

Tally ERP 9 Software मे  (2 Ledgers) Automatic बने हुये होते है (Cash And Profit& Loss Ka ). इन Ledgers की ही मदद से हम  Tally Me Entry को बहुत ही आसानी के साथ कर सकते है क्यूकी ये आप भी जानते है की बिना  Ledger Create किए बिना आप Entry को Post नहीं कर सकते है।

Tally Me Ledger Banana? how to create ledger in tally erp 9

Tally मे  Ledgers बनाने के लिए आपको कुछ Steps को Follow जरूर से करना होगा, आइये जानते है। tally ledger entry example

FIRST STEP: Ledger को बनाने के लिए सबसे पहले आप Gateway Of Tally मे  Accounts Info मे जाए फिर आप  Ledgers Par पर जाकर Click करे यहा आपको Create  का Option दिखाई देगा बस आप उस पर क्लिक करे create Ledger. process

NEXT STEP: Create Option मे Click करने के बाद आपके सामने Name का Option दिखाई देगा, बस आप उस Name के Option मे जाए और जो भी Ledger आपको बनाना है उसका पूरा नाम लिखे, Suppose हमको Computer Ka Ledger Create करना है तो हम उस बॉक्स मे Computer शब्द लिखेगे।   computer ledger

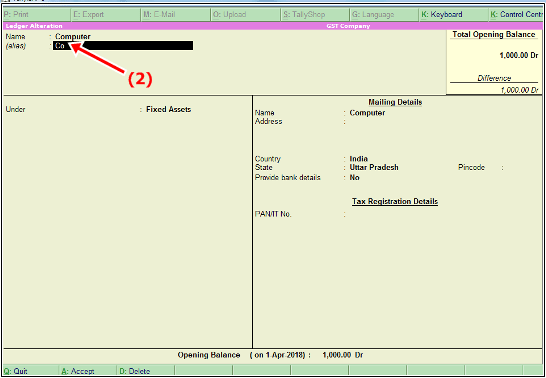
NEXT STEP: Alias के Option मे हम कोई ( उपनाम) उस Ledger का दे सकते है जिसकी मदद से हम उस Ledger को बहुत ही आसानी के साथ Access कर सकते है क्यूकी Tally मे  हमारे पास काफी सारे Ledgers होते है तो उन सब मे किसी एक Particular ledger को खोजना काफी जादा मुश्किल होता है। इसलिए हम कोई उपनाम उस ledger का दे सकते है, जिस से जब हम एंट्री करे तो उस उपनाम की मदद से हु उस particular ledger को आसानी से access कर सके। 

यहा मैंने एक Computer नाम का जो Ledger Create किया था उसमे Alias Name मे हमने Co उसका एक उपनाम दिया था, जिसकी मदद से हम उसे जल्दी से access कर सके। computer alias
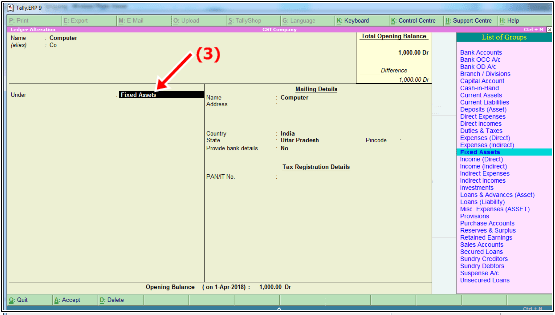
NEXT STEP: Under के Option मे हम एक  Group को Select करेगे,  Jaisकी हम जानते है की हर एक Ledgers का Tally मे अलग एक Nature define किया गया है जिसकी वजह से वो Ledger उसी तरह से काम करता है, अगर हम Group को गलत सिलैक्ट करेगे तो वो Ledger का effect गलत तरह से पड़ेगा हमारी बैलेन्स शीट पर इसलिए आप हमेशा सही Group का चुनाव करे, Ledger को बनाते समय। 

Example:- हमने जो Computer का ledgerबनाया है उसको हम Fixed Asset के ग्रुप मे रखेगे क्यूकी हम जानते है की computer हमारी एक Asset मतलब की संपति है इसलिए इसको हम Fixed Asset के Group मे ही रखेगे। computer group fixed asset
NEXT STEP: Mailing Details मे हम उस Ledger का नाम लिखेगे, और अगर कोई पता होगा तो उसको भी लिखेगे, उसके बाद जो country होगी उसको select करेगे, पिन कोड को select करेगे और फिरहाल आप अभी Provide Bank Details के Option को No ही रखेगे, क्यूकी अपने according जब Ledger बनाएगे उसके अनुसार बैंक डिटेल्स को भरेगे जहा हमको जरूरत होगी। PAN/IT No को भी अभी हम No ही रखेगे, जब जैसी जरूरत पड़ेगी उसके अनुसार हम इसको Yes/No करेगे।  all details ledger

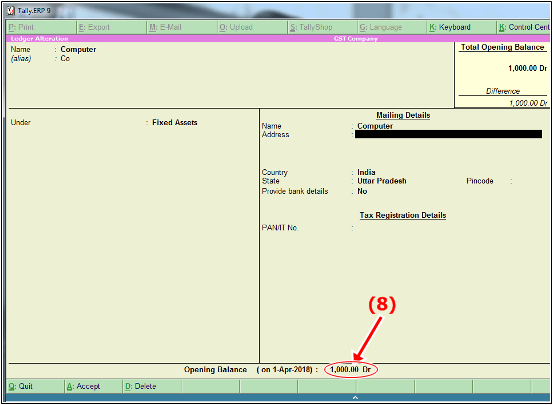
NEXT STEP: opening balance मे हम उस Ledger का जो भी opening balance होगा, वो जरूर से भरेगे, जैसे की हमने जो Computer का Ledger बनाया था उसको opening balance 1000 rs था, अगर आपके Ledger का कोई opening balance नहीं हो तो उसको आप नहीं भरेगे।   opening balance अब आपने इस Procedure के जरिये Tally मे Ledger Create करना आसानी से सीख लिया होगा।
Single और Multi Ledger Create In Tally ERP 9:

Single Ledger वो होते है जो एक साथ केवल एक ही Ledger हम Tally मे Create कर सकते है, जैसा की मैंने आपको   ऊपर बताया है वो Single Ledger है। 

Multi-Ledger वो होते है जिनहे हम एक साथ  Hotकई सारे Ledger को एक ही समय मे आसानी से Create कर सकते  Kar Sakte Hain है और सबसे बड़ी बात की Multi Ledger Create करने से ये फायदा है की आप एक साथ काफी सारे ledgers को बना सकते है और अपनी अकाउंटिंग एंट्री को तेजी से कर सकते है। 

आइये Screenshort से समझे की Single और Multi-ledgers आखिर क्या है? 

Single Ledger Creation:
Single ledger

Multi-Ledger Creation:

Multi-Ledger Create करने के लिए पहले आपको Create के  Option मे जाना होगा,और उसके बाद आप Under Group मे जाकर All Items को select करेगे उसके बाद आप नीचे की तरफ आएगे। और जो भी ledgers को create करना है, उस ledger का नाम लिखेगे और under मे Group को select करेगे, क्यूकी वो Ledger जिस भी Group मे आता है उसको ही Select करेगे और अगर आपका कोई Opening Balance होगा तो उसको भी  Fill कर देगे. तो इसकी प्रकार आप एक साथ काफी सारे Ledgers को बहुत ही आसानी साथ Create कर सकते है।

 एक Example के लिए मैंने यहा पर आपको  Sundry Creditor, Sundry Debtor, Fixed Assets, Duties, And Tax Etc से Related multi Ledgers को Createकिया है।  Multi ledger

Create, Display और Alter Options का क्या उपयोग है? आइये जाने।

  1. Create: Create Option की मदद से हम ledger को आसानी से Create Kar सकते है। 

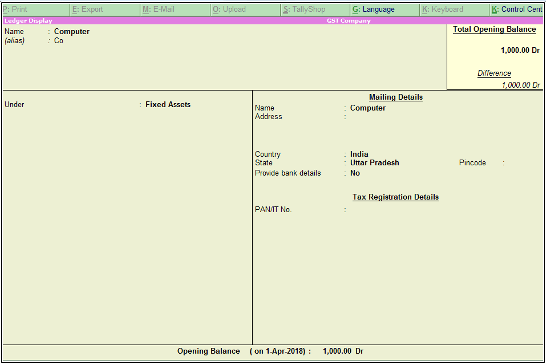
  2. Display: Display Option की मदद से हम उस Create किए हुये Ledger को बहुत ही आसानी के साथ देख सकते है। 

  3. Alter: Alter Option की मदद से हम Ledgers Modify कर सकते है मतलब की हम उस Ledger को Edit कर सकते कर सकते है और ledger को आसानी के साथ Delete भी कर सकते है। 


Tally मे Ledger को कैसे Alter (Modify) करे :-

Ledger को Alter मतलब की Edit करने के लिए हम Accounts Info मे Ledger मे Alter Option Par जाकर Click करेगे फिर उसके बाद हमे उस Ledger मे जो भी Alteration करना है , हम बहुत ही आसानी के साथ कर सकते है। 

Tally मे Ledger को कैसे Delete करे :-

Ledger को  Delete करने  के लिए भी हमे Alter के ही Option मे जाकर अपने कीबोर्ड से (Alt+D) Press करेगे तो वो Ledger आसानी से Delete हो जाएगा । 

Tally मे Ledger को कैसे Display करे :-

Tally मे बनाए हुये Ledger को दखने के लिए भी हमे Display के Option मे जाना होगा और जिस भी Ledger को दखना है  उसे Select करना होगा, जैसे ही आप Ledger को सेलेक्ट करेगे,आपको वो ledger आसानी से दिख जाएगा। 

Tally Me Predefine Ledgers:-

Tally मे आपको कई सारे Predefine Ledgers की List  यहा पर आपको दखने को मिलती है, जो की कुछ इस तरह से है।  list of ledgers in tally

Various Types tally Ledgers under the list

Group List files:- 

इस Group List मे मैंने आपको ये बताया है की कौन से Ledger को किस Group के Under मे Create किया जाता है, कृपया इसको ध्यान से पढे और समझे। 

Freight Outword

Indirect Expenses

Fuel & Power Of Factory

Direct Expenses

Furniture & Fitting

Fixed assets

Gas & Water

Direct Expenses

General Expenses

Indirect Expenses

General Reserve

Current Liabilities

Godown Rent

Indirect Expenses

Goods Sent On Consignment

Sales Accounts

Goodwill 

Fixed Assets

Horse & Cars

Fixed Assets

House Rent

Capital Account

Import Duty

Direct Expenses

Income From Repair

Indirect incomes

Income on Assets

Indirect incomes

Income on Investment

Indirect incomes

Income Tax

Capital Account

Insurance

Indirect Expenses

Insurance Claim

Indirect incomes

Insurance Company

Sundry Debtors

Interest(Dr)

Indirect Expenses

Interest On capital

Indirect Expenses

Interest On Drawing

Indirect Incomes

Interest On Loan

Indirect Expenses

Interest Received

Indirect incomes

Investment On Gov Bond

Investment

Investment

Investment

labour Charges

Indirect Expenses

Loan & Building

Fixed assets

Lease Hold Building

Fixed assets

Legal Expenses

Indirect Expenses

LIC Premium (Dr)

Capital Account

LIC Refund (Cr)

Capital Account

Life Insurance

Capital Account

Loss By Damage

Indirect Expenses

Loss By Fire

Indirect Expenses

Loss On Assets

Indirect Expenses

Machine & Tools

Fixed assets

Machine Repair

Fixed assets

Manufacturing Expenses

Direct Expenses

Master Plus

Investment

Miscellaneous Expenses

Indirect Expenses

Miscellaneous Incomes

Indirect incomes

Motor Cycle

Fixed Assets

Motorcycle Repair

Indirect Expenses

Mutual Fund

Investment

Office Expenses

Indirect Expenses

Oil

Direct Expenses

Opening Stock

Stock in Hand

Outstanding Exp

Current Liabilities

Packing Exp

Indirect Expenses

Personal Exp

Capital Account

Petrol Exp

Indirect Expenses

Postage & Telegram

Indirect Expenses

Power & Fuel

Direct Expenses

Prepaid Exp

Current Assets

Production Wages

Direct Expenses

Provision on office Exp

Current Liabilities

Purchase 

Purchase Account

Purchase on New land

Fixed assets

Purchase On Raw material 

Purchase Account

Purchase return 

Purchase Account

railway Authority

Sundry Debtors

Rent

Indirect Expenses

Rent on Purchase

Direct Expenses

Rent Payable

Current Liabilities

Rent Received

Indirect incomes

Repair Charges Received

Indirect incomes

Return Inword

Sales Accounts

Return Outword 

Purchase Account

Salary

Indirect Expenses

Salary & Wages

Indirect Expenses

Salary payable

Current Liabilities

Scooter

Fixed assets

Shares & Bonds

Investment

Shop

Fixed assets

Shop Exp

Indirect Expenses

Shop Rent

Indirect Expenses

Showroom

Fixed assets

wages

Direct Expenses

Bank Loan

Loan & Liabilities


Some Important Ledgers List:-

मैं यहा आपको कुछ Ledgers के Screenshot दे रहा हु , मैं उम्मीद करता हु की आपको अब Ledgers को Createकरने मे काफी आसानी होगी, आप इसकी मदद से ledger को बना सकेगे।

Sale Ledger

sales ledger


Purchase Ledger

purchase ledger

Round Off Ledger

round off ledger

Sundry Creditor Ledger

sundry creditor ledger

Sundry Debtor Ledger

sundry debtors ledger

Salary & Wages Ledger

salary & Wages

GST Tax Ledgers

CGST Ledger SGST Ledger

Discount Ledgers

discount ledger

Expense Ledgers

expenses ledger

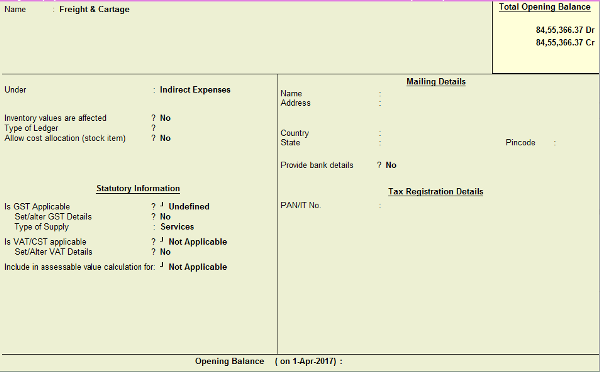
Freight Ledgers

frieght ledger

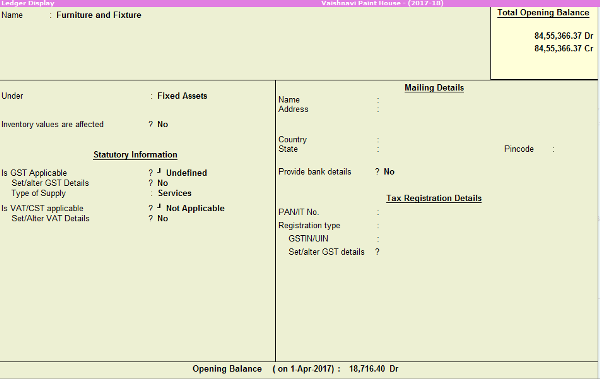
Fixed Assets Ledgers

fixed assets ledger

Bank Ledgers

bank account ledger

Bank Charges Ledgers

bank charges ledgers

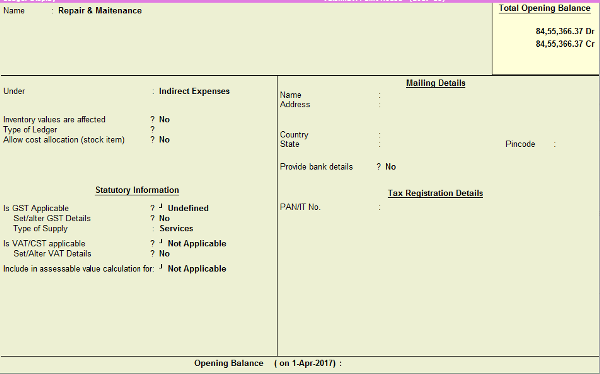
Repair & Maintenance Ledgers
repair & Maintain Ledgers


Stock Item Kya Hai? Tally Me Stock Items Ko Kaise Banaye?

Aaj Ke Badalte Hue Time Me Kya Aap Manually Stock Items Ko Ek Book Me Note Karke Rakhte Hai, Ya Phir Time Ke Sath Aapne Bhi (Tally ERP 9) Software Ka Use Karna Suru Kar Diya Hai. Manually Stock Items Ko Hum Pahle Ek Register Me Stock Items Ki Details Ko Note Karke Rakha Karte The, Magar (Tally ERP 9) Software Ke Aane Ke Baad Stock Items Ko Maintain Karna Kafi Aasan Ho Gaya Hai. Aaj Mai Aapko Batauga Ki Tally Me Stock Items Kya Hai. Tally Me Stock Items  Kaise Banaye? stock item creation in Tally

Stock Item Ka (Tally ERP 9) Me Kya Use Hai.Hamare Business Me Stock Item Ki Kya Importance Hoti Hai. Tally Me (Single And Multi Stock Items) Kya Hai Aur Inko Kaise Create Karte Hai. Jaisa Ki Hum Jante Hai Ki Tally Me Stock Group Create Karne Ke Baad Stock Items Ko Hum Create Karte Hai. Aaj Mai Aapke In Sabhi Sawale Ke Jawab Duga.

Stock Item Kya Hai?

Jin Bhi Chijo Ko Hum Apne Business Me Sale Ya Purchase Karte Hai Unko Hi Hum Stock Items Kahte Hai.Business Me Stock Item Ka Use Aksar  Len Den Me Kiya Jata Hai.

Tally Me Stock Items Ko Kaise Banaye?

Tally Me Stock Items Ko Banane Ke Liye Hamko Kuch STEPS Kom Follow Karna Padega.

STEP-1: Tally Me Stock Items Banane Ke Liye Gateway Of Tally Me Inventory Info Me Click Kare Phir  Stock Items Me Jake Click Kare Then Create Ke Option Par Click Kare.

process of stoc item create

STEP-2: Stock Item Me Name Ke Box Me Us Stock Item Ka Nam Likhege Jisko Hame Create Karna Hai. Example Hum Redmi Mobile Nam Ka Ek Stock Item Create Karte Hai.

Stock Item Create

STEP-3: Under Me Hum Us Stock Group Ko Select Karege, Jiske Under Me Redmi Mobile Aata Hai. Jaise Ki Hum Jante Hai Ki Redmi Mobile (Mobile) Nam Ke Stock Group Ke Under Aaega, To Hum Mobile Stock Group ko Under Option Me Select Karege.

Stock Item under

STEP-4: Units Sabse Pahle Jante Hai Unit Kya Hoti Hai Units Wo Hoti Hai Jiske Through Hum Kisi Bhi Chij Ke Napate Hai, Aur Har Vastu Ki Apni EK Alag Units Hoti Hai. Example-( Milk Ki Unit Hogi Liter Etc ), To Units Me Hum Ek Unit, Create Kar Lege, Ki Redmi Mobile Ko Kis Unit Me Sale Out Karna Hai. Maine Yaha Pieces (PCS) Name Ki Unit Create Ki Hui Hai.

Stock Item Unit

STEP-5: Opening Balance Agar Us Item Ka Koi Opening Balance Hoga To Uski Jo Bhi  Quantity,Rate(per) Aur Value Jo Bhi Hoga Us Ko Hum Dal Dege.

Stock Item quantity And Rate

Stock Items Ko Dakhna, Alter Karna Aur Delete Karna:

Stock Items ko Dakhne Ke Liye Gateway Of Tally Me Inventory Info me jake Stock Items Me Display Option Par Click Karege, To Aapne Jo Jo Bhi Stock Items ko Create Kiya hai wo Sabhi Stock Items Aapko Dikhai Dege.

Stock Items Ko Alter Karna:-

Stock Items ko Edit Karne Ke Liye Aapko Alter Option Me jake , Click Karna Hai .Waha par List Of stock Items Me Aapko Wo Items Ko select karna Hoga Jisko Alter Karna Hai To wo Item Open Ho Jaegi. Ab Aap Stock Items Ki Sari Details Ko Edit Kar Sakte Hai.

Stock Items Ko Delete Karna:-

Stock Items Ko Delete Karne Ke Liye Bhi Hamko Alter Option Me Jake, List me Jo Stock Item Ko Delete Karna Hai ,Usko select Karege Aur (Alt+D) Keyboard Se Press karege Wo Stock Item Delete Ho Jaegi.

Single Stock Items Kya Hain?

Tally Me Jab Ek Time Me, Ek Hi Stock Items Ko Hum Create Karte Hai To Usko Single Stock Items  Kahte Hai (As Like- Redmi Mobile Ko Create Karna)

Stock Item Single

Multi-Stock Items Kya Hain?

Multi-Stock Items Banane Ke Liye Gateway Of Tally Me Inventory Info Me Jake Stock Items Par Click Karege. Fir Multi Stock Item Me CREATE Par Click Karege, Uske Baad Ek Page Open Hoga Jisme Under Group Ke Option Me All Items Ko Select Karege. Uske Baad Name Of Item Me Wo Us Item Ka Nam Likhege Jisko Aapko Create Karna Hai. Under Ke Option Me Jo Stock Group Humne Create Kiya Hai Usko Select Karege, Fir Units Ke Option Me Hum Us Unit Select Karege, Jo Ki Us Stock item Ki Unit Hogi And Opening Quantity Agar Us Stock Item Ki Hogi, To Rate And Amount Ko Fill Karke Stock Item Ko Save Kar lege.

 Example Yaha Maine Kai Sare Multi Stock Items Ko Create Kiya Hai.

multiple Stock item create

Stock Category Kya Hai?

Stock Category Means Hamare Stock Ko Alag-2 Category Me Divide Karna Jaise- Tv Hamara Ek Stock Group Hai Aur T.v Kai Inches Me Market Me Aata Hai. Like( 25 Inch,32 Inch,40 Inch Etc) Hum Isi Ko Category Kahte Hai.

Means Stock Items Ko Alag Alag Category Me Divide Kar Dena Jis Se Hamko Apne Stock Ki Puri Knowledge Ho Sake Ki Hamare Business Me Kaun Sa Stock Item Hai Aur Wo Stock Item Kis Category Me Available Hai.

Tally Me Stock Category Option Ko Active Kaise Kare?

First Step: Tally Me Stock Category Option Pahle Se Active Nahi Hota Hai. User Ko Apni Suvidha Ke Anusar Is Option Ko Active Karna Hota Hai. Stock Category Option Ko Active Karne Ke Liye Gateway Of Tally Me Features Option Me Jaye Ya Phir Keyboard Se (f11) Botton Ko Press Kare

Feature option tally

Next Step: Yaha Inventory Features Par Click Kare.

inventory Features

Next Step: Uske Baad Inventory Se Related Window Open Hogi, Yaha Par Storage And Classification Option Me Aapko Maintain Stock Category Option Dikhega.  Is Option Ko Yes Kar De Aur Isko Save Kar Le. Save Karne Ke Liye (Ctrl+A) Keyboard Se Press karege, Ab Aapka Stock Category option Active Ho Gaya Hai.

stock categegory Features

Tally Me Stock Category Banana?

STEP-1: Tally Me Stock Category Option Ko Active Karne Ke Baad Gateway Of Tally Me Inventory Info Me Jaye Aur Yaha Aapko Stock Category Ka Option Dikhai Dega, Yaha Click Kare Aur Create Option Me Jake Click Kare.

Process of stock category

STEP-2: Yaha Aapko Stock Category Creation Ki window Dikhai Degi. Isme Name Me Hum Wo stock Category Ko Nam Likhege, Jisko Hamko Create Karna Hai. Suppose Hamko (Tv) Jo Ki Hamara Stock Group Tha, To Hamko Tv Ke Lie Stock Category Ko, Create Karna Chahate Hai, To Hum (32 Inches Sony Tv ) Ki Stock Category Create Kar Lege.

stock category banana

STEP-3: Under Me Hum Primary Option Ko Hi Select Karege Aur Yes Karke Save Kar Lege. Hamari Stock Category Create Ho Gai Hai.

stock category primary

Stock Group, Stock Category And Stock Items List With Example:-

S.No

Stock Groups

Stock Categories

Stock Items

1

T.v

19 inches

Sony

2

T.v

21 inches

LG

3

T.v

32 inches

Videocon

4

Laptop

15.6 Screen

Lenovo

5

Laptop

18.6 screen

Acer

6

Laptop

23.5 screen

HP

7

Fridge

21 inches Long

Sony Fridge

8

Fridge

25 inches Long

Whirpool

9

Fridge

18 inches Short

Samsung

10

Washing Machine

32 inches Long

LG

11

Washing Machine

40 inches Long

Samsung

12

Washing Machine

23 Inches Short

Sony

13

Mobile

3 Gb Ram 32 Storage

Redmi

14

Mobile

2 GB Ram 16 Storage

Moto

15

Mobile

4 Gb Ram 64 Storage

Apple


Yaha Kuch Stock Items List Ko Maine Bataya Hai. I Hope Its Helpful for You.